
Gallery track lighting systems fail in a predictable way: not because the fixtures are cheap, but because the wrong voltage was chosen for the run length, or the beam was never converted into a spot size. This guide works through the 24V low-voltage versus line-voltage decision the way a lighting designer does — geometry first, hardware second — and shows the numbers that keep a gallery wall even from floor to cornice.
Everything below is written for two readers at once. If you are specifying a museum or commercial gallery, the lux, CRI and beam figures are the ones that go into the schedule. If you are building a home gallery wall — the look that has taken over interiors in the last two years — the same physics applies at a smaller scale, and the mounting geometry matters even more because the room is too small to hide a mistake.

Start with the wall, not the track
A gallery wall gives you three fixed dimensions and one variable. The fixed dimensions are the wall height, the hanging height of the artwork, and the size of the pieces. The variable is where the track sits — its setback from the wall and its drop from the ceiling. That single decision drives the throw distance, and the throw distance drives everything else.
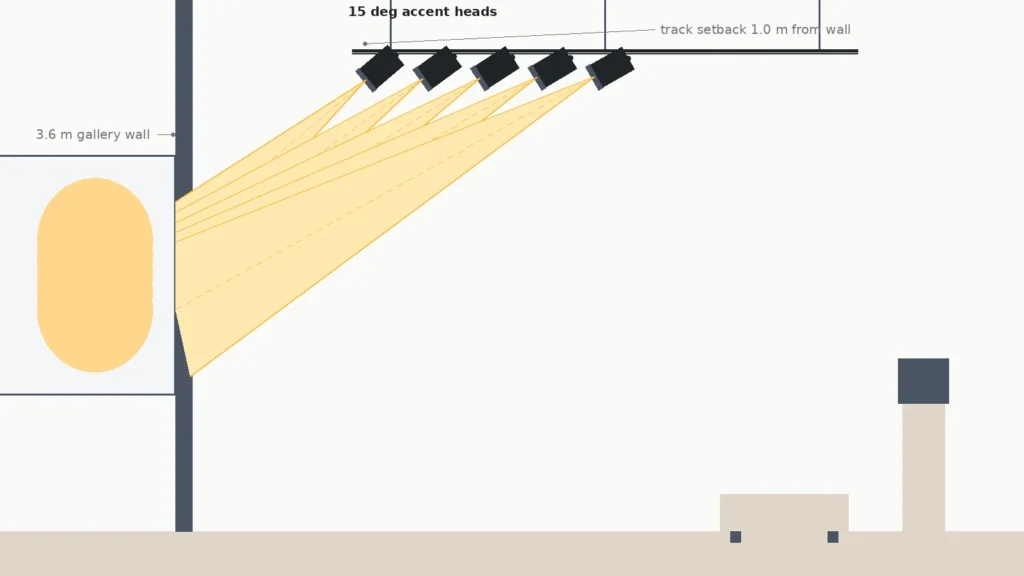
Take a common commercial case: a 3.6 m wall, a 1.2 m wide canvas hung with its centre at 1.6 m, and a track hung 0.6 m below the ceiling and 1.0 m out from the wall. The fixture sits at 3.0 m above the floor, so the throw to the centre of the canvas is the hypotenuse of 1.0 m out and 1.4 m up — about 1.72 m. That is a short, steep throw, and it is the number that decides your beam angle.
Convert beam angle into spot size before you buy anything
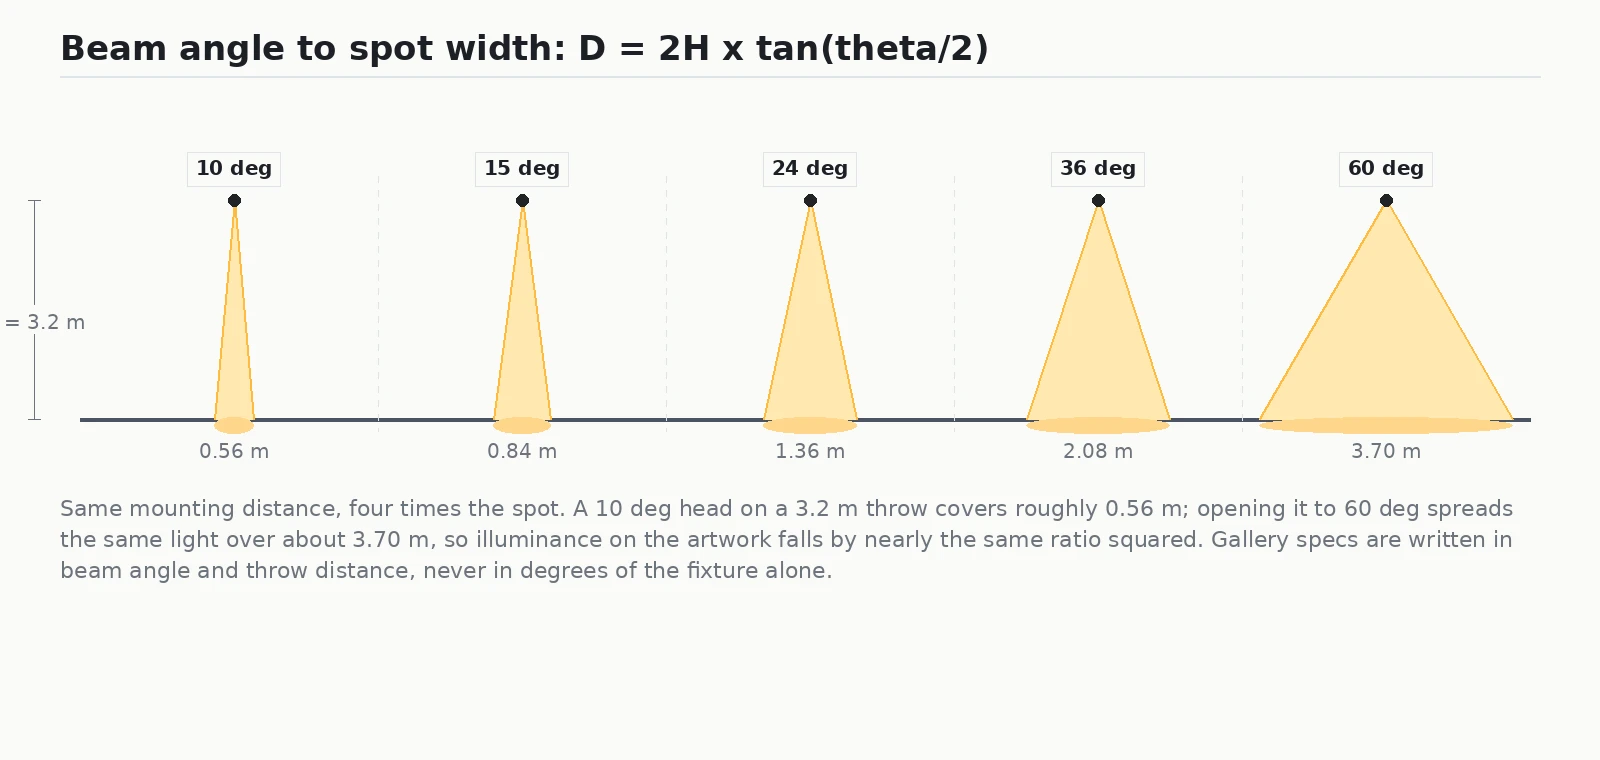
Beam angle on its own tells you nothing. A 24° head is narrow on a 1.7 m throw and uselessly tight on a 12 ft ceiling. The only conversion that matters is the spot diameter at the artwork:
D = 2 × H × tan(θ ÷ 2), where H is the distance from the lens to the surface and θ is the beam angle.
Run it on the wall above. At 24°, the spot is 2 × 1.72 × tan(12°) ≈ 0.73 m across — roughly 60% of the canvas width, which is the classic ratio for an accent that lets the frame read. Open the same head to 36° and the spot grows to about 1.12 m, which now sits almost exactly on the canvas edge. Go to 60° and you have 1.98 m of light on a 1.2 m painting, and the spill on the wall beside it is what makes a gallery look amateur.
Note what happens to brightness. Spreading the same lumens over a 60° cone instead of a 24° cone puts roughly 2.7× less illuminance on the surface, because the lit area scales with the square of the diameter. Most “this fixture is too dim” complaints on gallery projects are really beam-angle complaints.
Now the voltage question: 24V low-voltage versus line-voltage track
Voltage is not a quality ranking. It is a cable-capacity decision that produces two different-looking systems. Both 24V and line-voltage track will light a gallery correctly; they differ in rail size, head size, how many heads you can put on one run, and how gracefully they behave on long throws. Pick on those four, not on fashion.
What 24V low-voltage track gives you
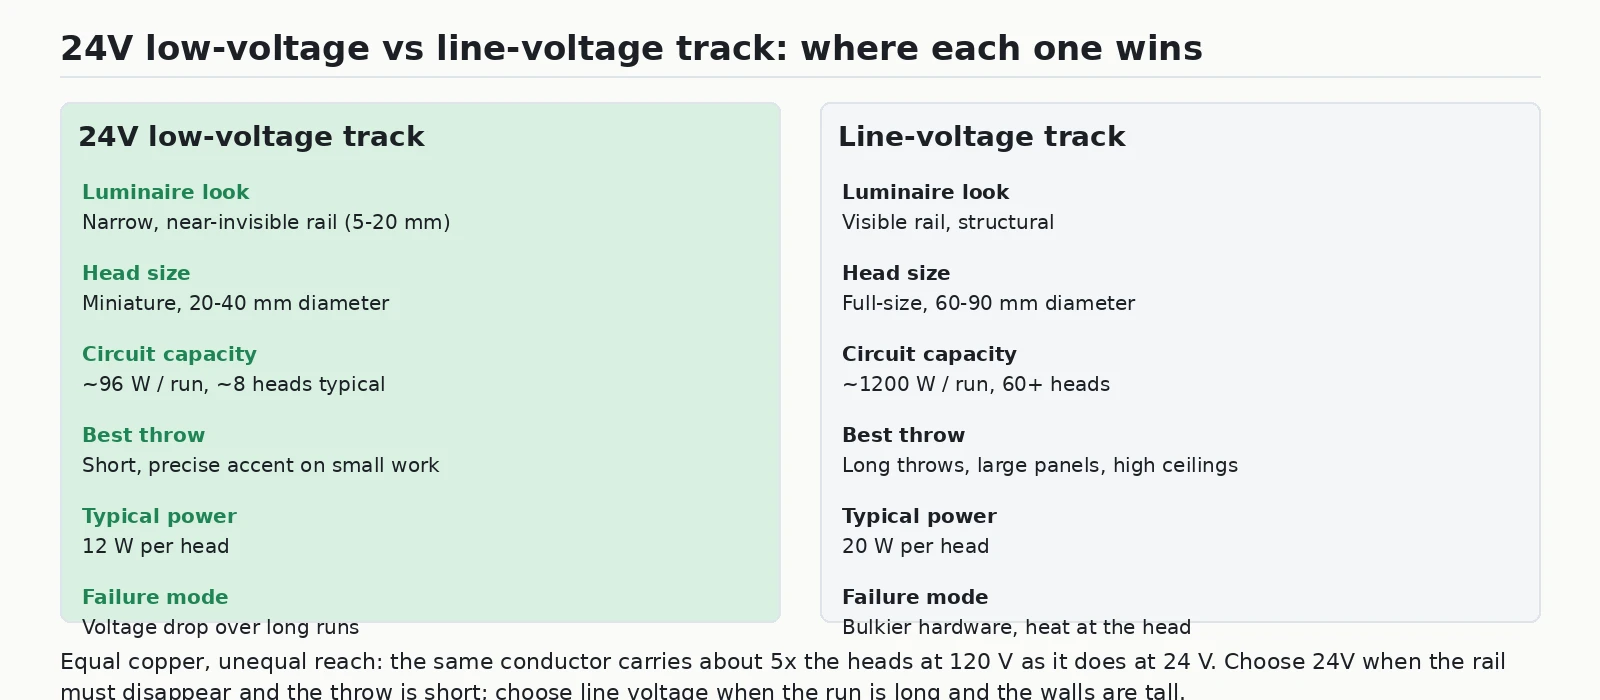
A 24V system carries a step-down transformer at the feed, so the rail itself runs at low voltage. That lets the rail be genuinely slim — 5 to 20 mm is common — and the heads miniature, often 20 to 40 mm in diameter. For a gallery this is a real design win: the hardware disappears into the ceiling and the visitor sees only the light.
The trade-off is current. At 24V, 96 W is roughly the practical ceiling for one circuit, so a run of 12 W heads tops out around 8 heads. Push further and voltage drop starts stealing lumens from the last head on the run — the failure mode is a rail that visibly dims as it goes. Feeding a long 24V run from both ends, or splitting into two circuits, is the standard fix.
What line-voltage track gives you
Line-voltage track carries mains directly on the rail. The same conductor now moves 120 V instead of 24 V, so for the same copper and the same proportion of voltage drop it can carry about 5× the load. A single 1200 W circuit is unremarkable, and 20 W framing heads at that budget means 60-plus heads on one feed.
You pay for that in hardware. The rail is visible and structural, and the heads are full size — 60 to 90 mm diameter is typical because the driver and thermal path sit in the head. On a high ceiling with a long throw, that is a fair trade. On a domestic gallery wall with a 2.4 m ceiling, it usually is not.
Gallery lighting requirements by space and scale
The numbers below are the working targets we specify against for gallery and display spaces. They follow the practice set out in museum and gallery lighting guidance, where the governing principle is that the artwork is the task surface and everything else is background.
| Space | Lux on artwork | CCT | CRI | Beam / angle | Recommended system |
|---|---|---|---|---|---|
| Commercial gallery, paintings on paper | 50–150 | 3000–3500K | 95+ | 15–24° accent | 24V track, framing heads |
| Commercial gallery, oil and acrylic | 150–300 | 3000–3500K | 90–95+ | 24–36° accent | 24V track, zoomable heads |
| Museum, mixed media and sculpture | 150–300 | 3000–3500K | 90+ | 24–36° plus wall wash | Line voltage for long runs |
| Home gallery wall, framed prints | 150–300 | 2700–3000K | 90+ | 24° accent | 24V magnetic track |
| Home gallery wall, photographs | 100–200 | 3000K | 90+ | 15–24° accent | 24V magnetic track |
| Retail display inside a gallery shop | 300–500 | 3000–4000K | 90+ | 24–36° accent | Line voltage for head count |
| Gallery lobby and circulation | 100–200 | 3000–3500K | 80–90+ | 36–60° flood | Either, on drop length |
| Conservation store, light-sensitive works | 50 or lower | 3000K | 95+ | Framed accent only | 24V with dimming |
Why framing heads, not ordinary spotlights, do the fine work
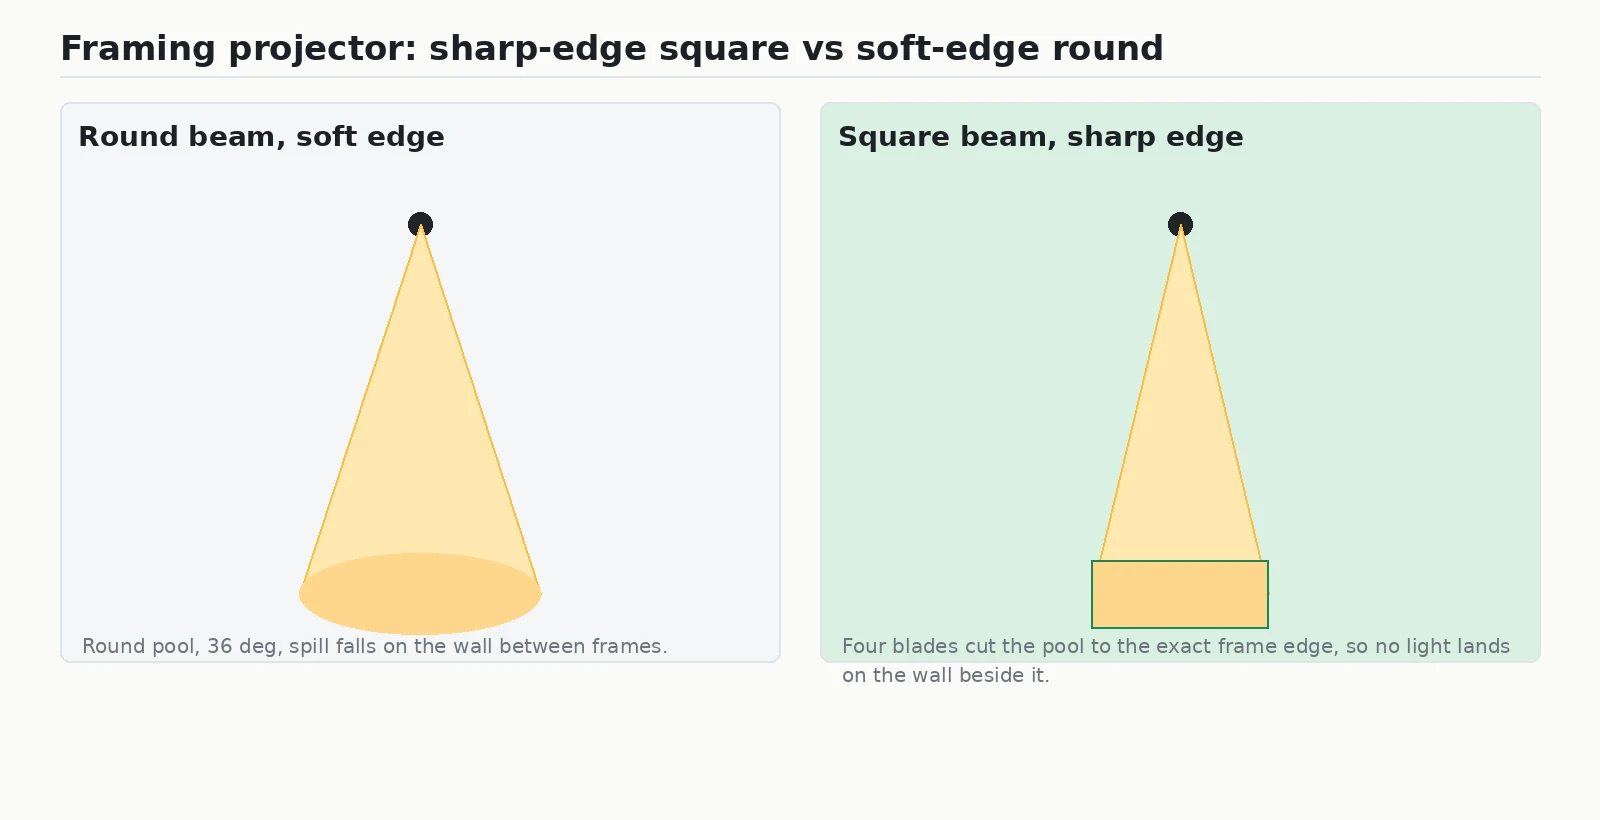
Once the geometry is right, the last variable is the shape of the pool of light. A standard spotlight throws a round cone with a soft edge. On a gallery wall that is a problem, because the round pool is bigger than the rectangle you actually want to light, and the difference lands on the wall beside the frame as spill.
A framing projector — the 切光灯 in a Chinese specification, the contour projector in a museum one — fixes this with four internal blades. Pull and push them and you cut the beam to the exact shape of the artwork. A camera-like front lens adds a second control: pull it out for a soft, romantic edge, push it in for a hard, modern one. The result is that light lands on the painting and stops at the frame line.
The hardware that does this work
Two products from our own catalogue cover almost every gallery schedule, and they map cleanly onto the 24V / line-voltage split.
IMAX-Projector 10–20W — the framing head
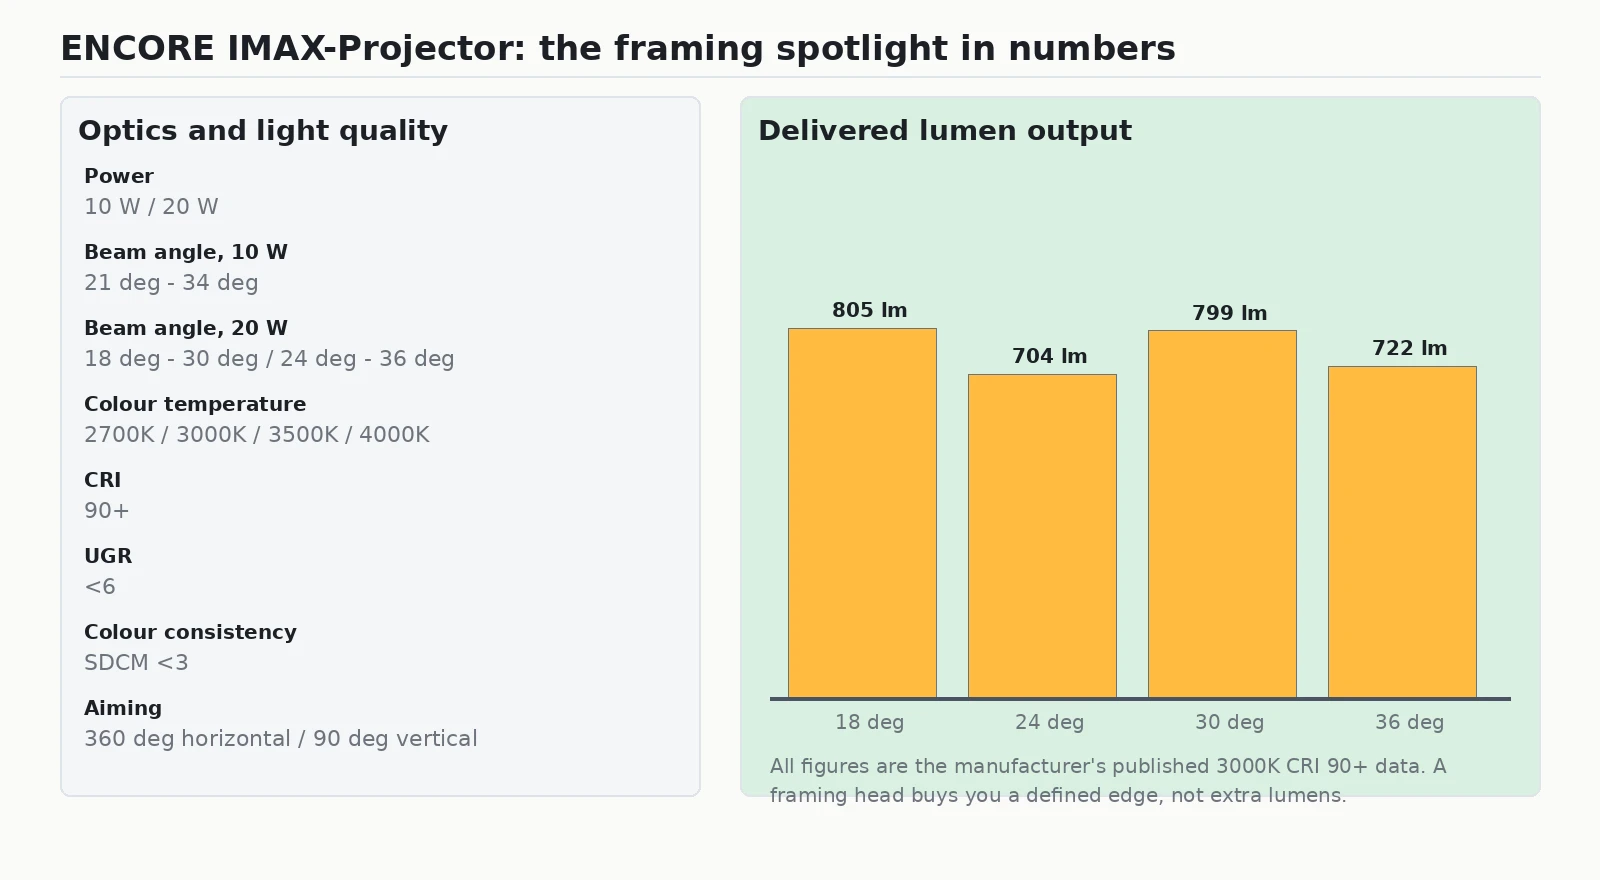
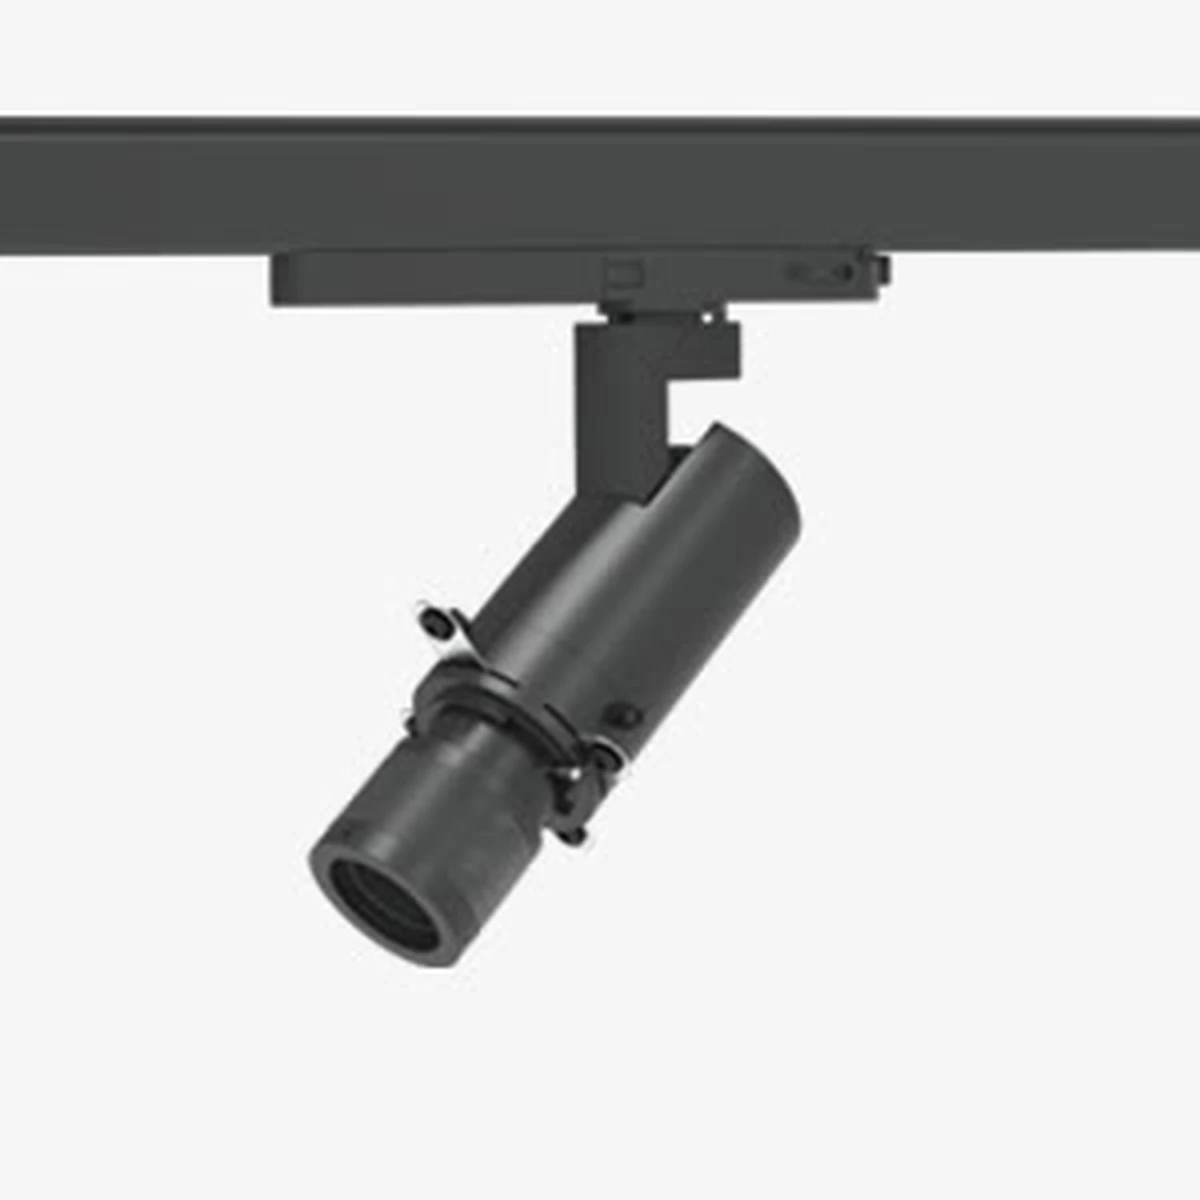
The IMAX-Projector 10–20W is a track-mounted contour projector built specifically for museums, exhibitions and art galleries. It uses a precision optical lens and a framing pattern mechanism to produce sharp-edged, high-contrast square and triangle light shapes, with logo projection available if a gallery wants a mark thrown onto a wall. UGR is held below 6 and the optical system is designed for zero spill and zero stray light, which is what lets you leave the ambient level low and still see the work.
The published data at 3000K CRI 90+ runs from 704 lm at 24° to 805 lm at 18°, with beam angles of 21–34° at 10 W and 18–30° or 24–36° at 20 W. The head rotates 360° horizontally and 90° vertically without a dead angle, and the visible surfaces carry no screws — a small detail that matters on a ceiling a visitor will stare at all afternoon.
IMAX-Zoomable and VEGA — the flexible alternatives
If the gallery changes its hangs, a fixed beam is a liability. The IMAX-Zoomable 15W–30W covers 10–70° in the sharp version and 15–70° in the soft one, from 243 lm to 1828 lm, with CRI options up to 95+. Set it narrow for a small etching and open it wide for a large abstract without swapping heads. Where a project needs a genuinely slim framing head, the VEGA-Projector 20W shapes light into squares and rectangles at 55° in a compact body.
For home gallery walls, the track lighting range includes 24V magnetic systems that keep the rail invisible at domestic scale. If the wall has to be re-lit from a phone — the direction the last two years of residential interior work are clearly heading — the MOVIA motorized track light 30W pans 360°, tilts ±140° and zooms 18–60° under wireless control.
Get the spacing right or the wall stripes
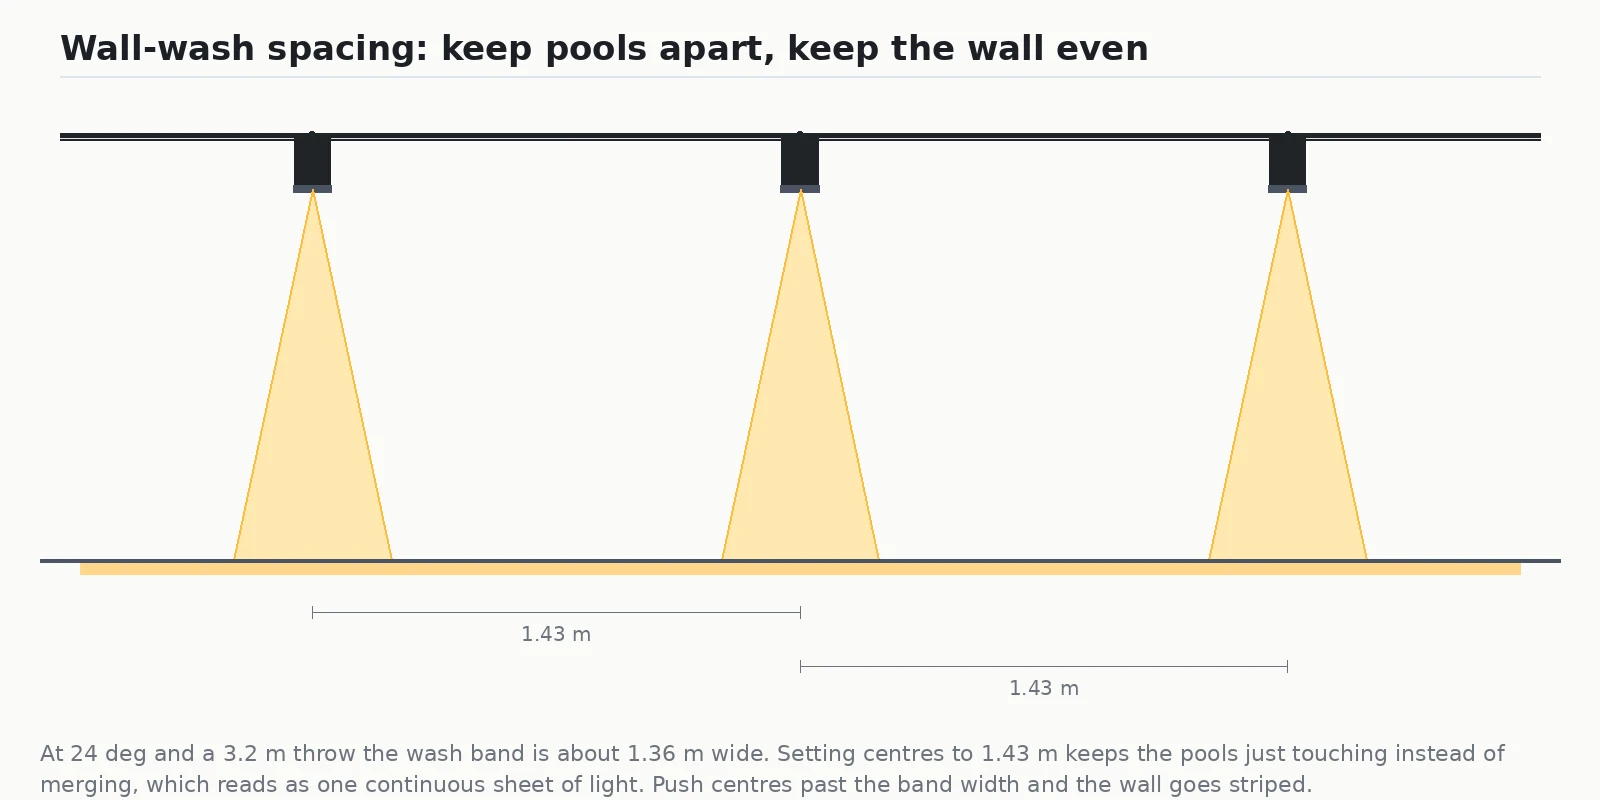
Beam angle sets the pool size; spacing sets whether those pools read as one sheet of light or as separate blobs. The rule is simple: adjacent pools must not merge, which means the centre-to-centre distance is at least the pool radius sum — in practice, at least one pool diameter apart.
On the 3.2 m throw shown earlier, a 24° head produces a 1.36 m band, so centres of 1.43 m keep the pools just touching. Push centres to 1.8 m and you get a striped wall. Pull them to 1.0 m and you are wasting heads and over-illuminating the middle of the band while the edges stay dim. Uniformity — the ratio of minimum to maximum illuminance across the wall — is the number a gallery owner actually notices.
The home gallery wall: the same physics at 2.4 m
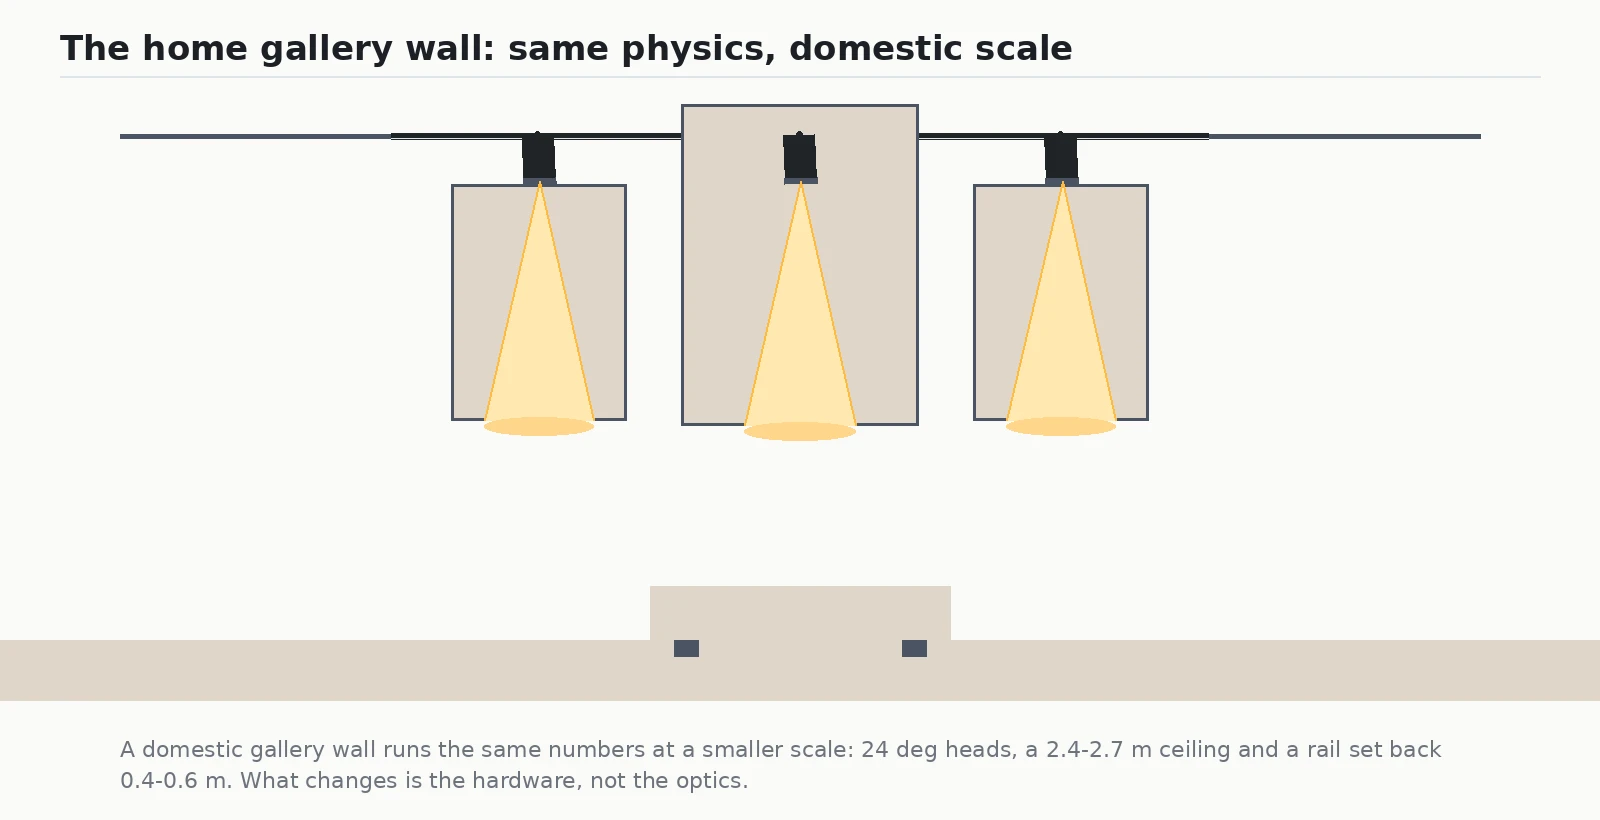
The domestic version of this look does not change the optics, only the scale. A typical living room ceiling is 2.4 to 2.7 m, so the track sits 0.4 to 0.6 m below it and 0.4 to 0.6 m out from the wall. Throw distances drop to 1.2–1.8 m, which is why 24° heads at 12 W and 24V magnetic track dominate the residential market — the rail vanishes into the ceiling and one head covers one framed print.
Two things change and they matter. First, warm it up: 2700–3000K reads as residential, while the 3500K a commercial gallery would use looks clinical in a living room. Second, dim it — a home gallery wall is used in the evening, and without dimming the illuminance that is correct at midday is glaring at 9 pm.
Three ways a gallery track specification fails
Nearly every problem we are asked to solve on a gallery project traces back to one of three errors, and each one is visible on the drawing before a single fixture is ordered.
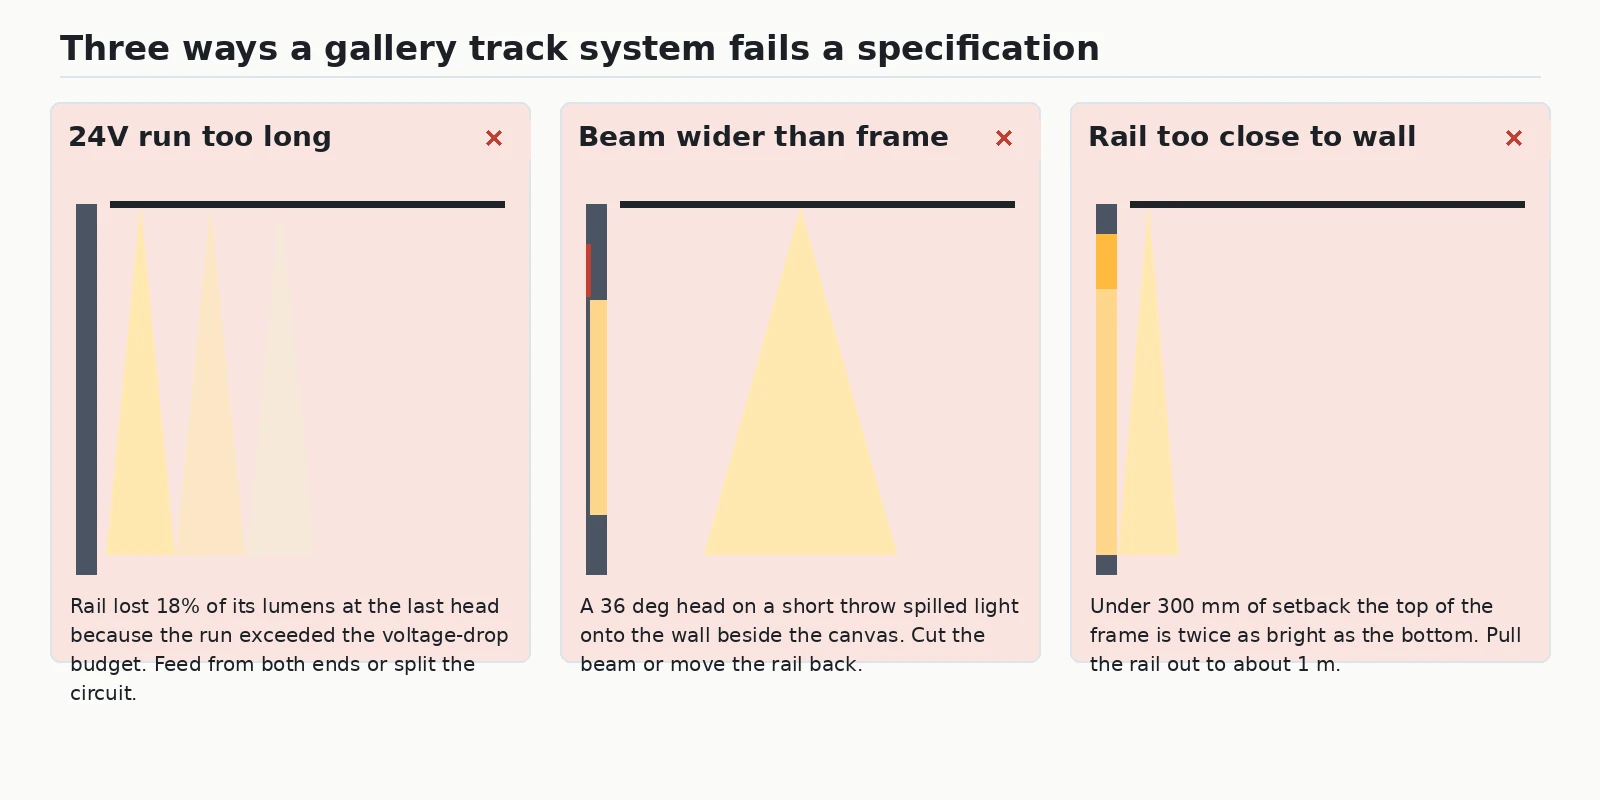
A 24V run that is too long. The rail exceeds its voltage-drop budget and the last head on the run delivers visibly less light than the first. On a 96 W circuit that budget arrives quickly. Feed both ends, or split the run.
A beam wider than the frame. A 36° head on a short throw puts a pool larger than the canvas, and the light that misses lands on the wall beside it. Either narrow the beam or move the rail further back to increase the throw.
A rail too close to the wall. Under 300 mm of setback, the top of the frame is nearly twice as bright as the bottom, because the steep angle means the top of the work is far closer to the lens. Pulling the rail out to about 1 m evens the wash.
Gallery track systems: frequently asked questions
Is 24V or line voltage better for a gallery track system?
Neither is better in the abstract. Choose 24V when the rail must nearly disappear and the throws are short, which is the commercial gallery and the home gallery wall. Choose line voltage when the run is long, the ceiling is high, or the head count per circuit is large, which is the museum and the larger exhibition hall.
How many heads can go on one gallery track circuit?
At 24V with a practical 96 W circuit and 12 W heads, plan for about 8 heads per run. At 120 V on a 1200 W circuit with 20 W heads, 60-plus heads is achievable. Always verify against the actual driver load and the manufacturer’s voltage-drop data rather than the nominal numbers.
What lux should gallery artwork receive?
For paintings and works on paper, 50–150 lux; for oil and acrylic, 150–300 lux; for mixed media and sculpture, 150–300 lux with wall wash for context. If a work is light-sensitive, the lux limit governs everything else and dimming becomes mandatory.
What beam angle should gallery track heads use?
Convert first: spot diameter equals 2 × throw × tan(half the beam angle). For a 1.7 m throw onto a 1.2 m canvas, 24° gives about 0.73 m — a clean accent. Use 15° for small or highly detailed works and 36° only where the piece is large or the throw is long.
What CRI do gallery and museum lights need?
CRI 90+ is the floor for professional gallery work and 95+ is preferred for works on paper and any piece where colour accuracy is part of the value. SDCM within 3 keeps two heads on the same wall from reading as different whites, which is more noticeable in a gallery than in most interiors.
Can I use ordinary spotlights instead of framing projectors?
You can, and many home gallery walls do. The difference is spill: a round pool is larger than the rectangle you want lit, so light lands on the wall beside the frame. Where the wall between works is part of the composition — which is the whole point of a gallery hang — a framing head is the correct tool.
Specify the geometry before you buy the fixtures
Gallery track systems reward the order of operations. Fix the wall height, hanging height and setback first; convert the throw into a spot diameter; only then choose between 24V and line voltage on the basis of run length and head count. Do that and the hardware decision becomes obvious — a 24V magnetic rail for the home gallery wall, a line-voltage run where the ceiling is high and the schedule is long, and a framing projector wherever the edge of the pool has to land on the edge of the artwork.
If you are specifying a gallery, museum or residential gallery wall and want the numbers checked against your own drawings — throw distances, beam angles, spacing and circuit load — send us the layout and we will return a lighting schedule, including framing projector options from the IMAX and VEGA families. For the broader technical background, our guide to museum lighting requirements for lux, CRI and UV covers conservation limits in more depth.