
Every food photographer eventually learns the same expensive lesson: the light that makes food delicious and the light that makes it photographable are not the same light. A dining room and a camera share one requirement — a broad, high-CRI spectrum with strong red rendering — and disagree about everything else. A guest experiences a plate in continuous adaptation, over minutes, in motion, with both eyes and a memory of smell. A sensor experiences it in one 1/125 s sample, in three channels, at a fixed white balance chosen before the plate arrived. This guide sets out what that difference actually changes on set: colour temperature, the blue-channel budget, beam geometry for texture, and the specifications worth writing down.
The short version. Ra 90 minimum but Ra 95+ preferred, R9 above 90 stated in writing, 2700K to 3000K for a warm restaurant look, 3200K to 5000K when the frame has to stay gradeable, and a 24° to 36° optic at roughly 45° across the plate. Everything below explains why each of those numbers is where it is.
If you are lighting the room rather than the shoot, the companion article is 2700K vs 3000K on the plate, which argues the spectrum from the guest’s side. This article argues it from the sensor’s.

What a camera sees that a guest does not
Three differences decide every choice on a food shoot.
The eye adapts; the sensor does not
A guest walks into a 2700K dining room and within thirty seconds the entire visual system has re-referenced to it. A candle looks white, the linen looks white, and the room reads warm only in contrast with the street outside. A camera has no such mechanism. Set a 5500K white balance under the same 2700K lamp and the whole frame goes amber; set 2700K and you have declared the lamp the reference, which is a decision rather than an observation.
The practical consequence is that a shoot needs a stated white balance written into the shot list, not a correction in post. Post-processing a badly reference-balanced frame costs two stops of latitude in the red channel and is the most common reason a graded food image looks muddy.
The sensor clips per channel, the eye does not
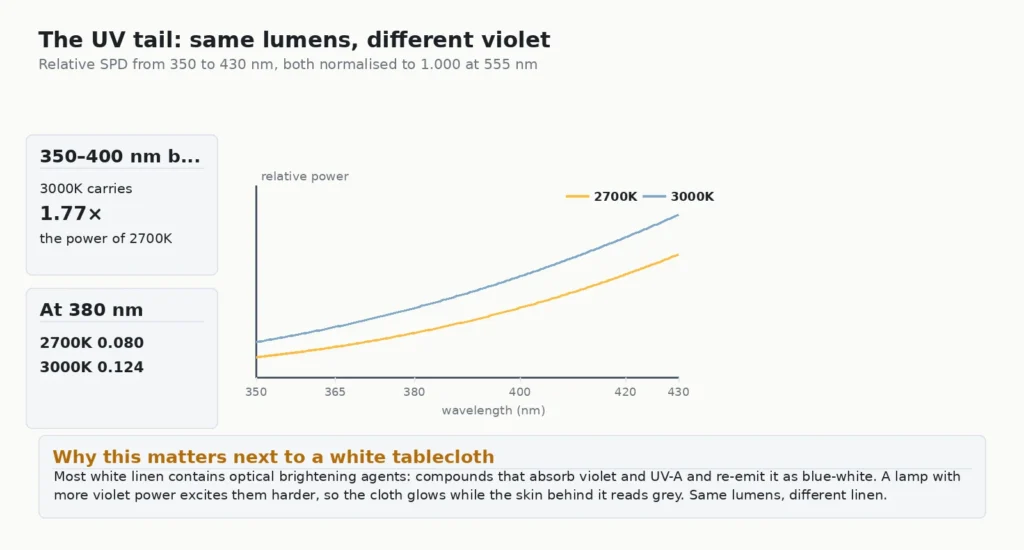
An image sensor records red, green and blue into three separate wells, and each clips independently. That is the mechanical reason a warm lamp can be simultaneously flattering to the plate and hostile to the photograph: a 2700K source carries a large red content and a much smaller blue content, so the red channel can saturate while blue sits at a fifth of its capacity. The result is a plate whose highlights are already gone, with no data left to grade.
This is the strongest technical argument for 3000K or 3200K on set. The cooler source moves the same amount of energy into the blue channel, which raises the ceiling before clipping, while staying warm enough that the food still reads as restaurant food rather than as a laboratory sample.
The camera is a better colour critic than the guest
A guest will accept a plate that reads slightly warm because the room supports it. A photograph has no room. Once the plate is isolated in a frame, every decision the lamp made becomes visible and permanent, which is why the shoot specification has to be tighter than the dining specification rather than looser.
Colour temperature: what 2700K, 3000K and 3200K each do to a plate
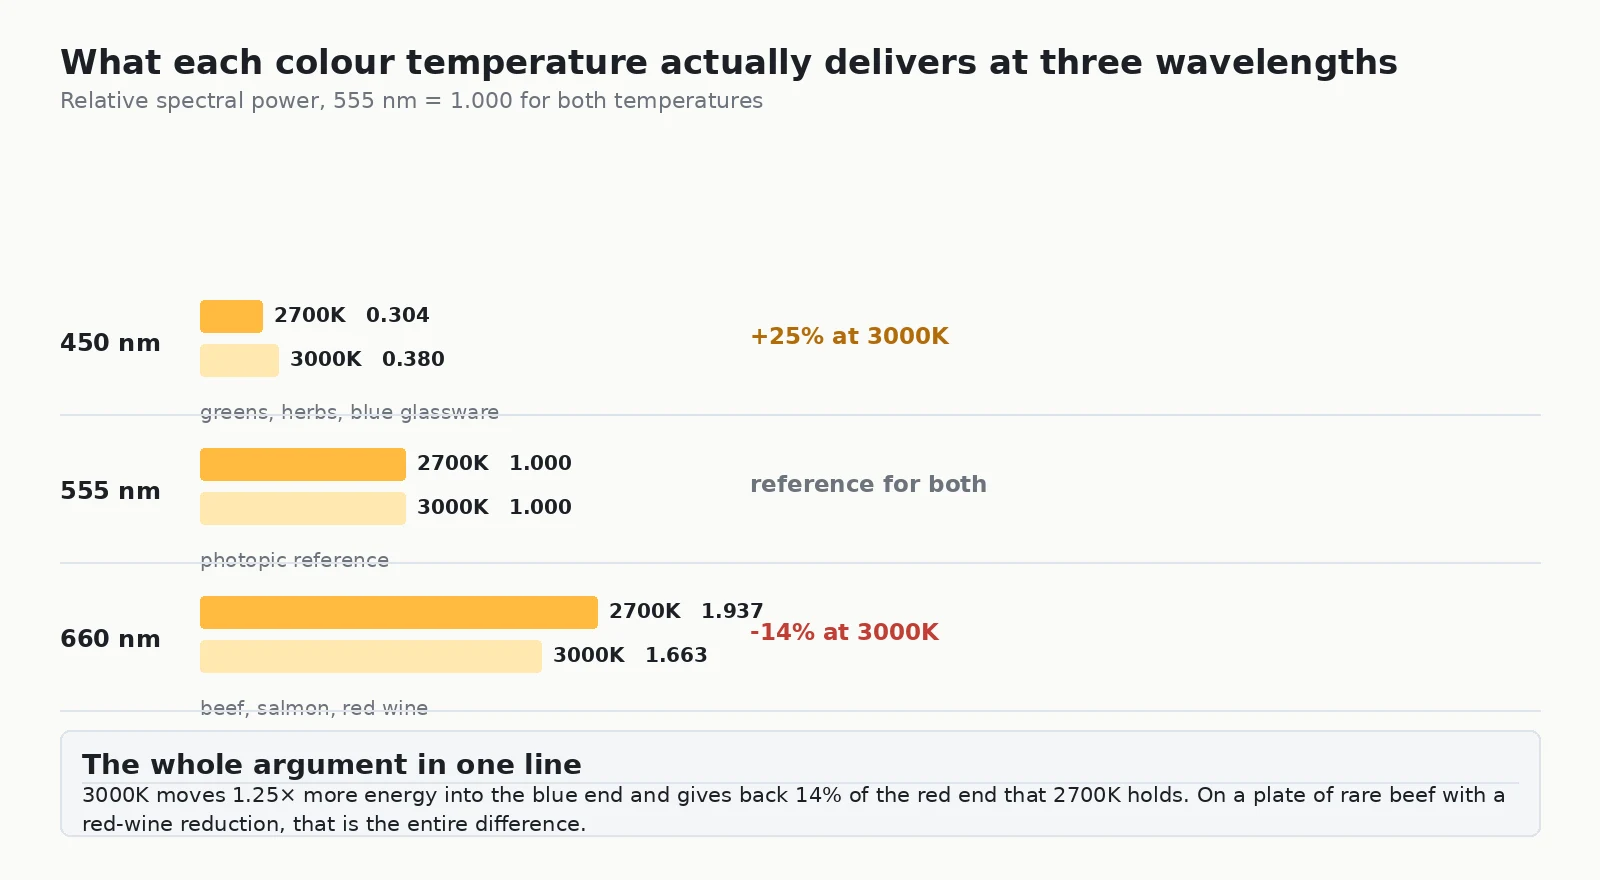
Computed from the Planck function and normalised to 1.000 at 555 nm, the three temperatures differ in ways that map neatly onto menus.
| Source | Relative power at 450 nm | Relative power at 660 nm | Reads as | Best for |
|---|---|---|---|---|
| 2700K | 0.304 | 1.937 | candlelit, expensive | Steak, red wine, caramel, baked goods |
| 3000K | 0.380 | 1.663 | warm restaurant | Mixed menus, plated mains, all-day rooms |
| 3200K (tungsten) | 0.438 | 1.489 | neutral warm | Greens, cold plates, glassware, gradeable frames |
Read the table as three separate trades. Moving from 2700K to 3000K gains about 25 percent relative power at 450 nm and gives back about 14 percent of the deep red at 660 nm. Moving from 2700K to 3200K gains about 44 percent at 450 nm and gives back roughly 23 percent at 660 nm. The first trade is almost free for a camera; the second starts to be visible on a plate of rare beef.
So the working rule is straightforward: 2700K when the menu is red and the frame is allowed to look like a restaurant, 3200K when the frame has to survive grading, and 3000K when both matter at once. That last case is most professional food work, which is why 3000K is the most-specified temperature in hospitality photography.
The colour numbers that matter: CRI, R9 and the limits of Ra
CRI — correctly CIE Ra — is the average of eight colour-rendering scores, R1 through R8, measured against eight pastel test patches. None of those eight patches is a saturated red, and that saturated red is scored separately as R9, deliberately excluded from the average. A datasheet can therefore print “CRI 90” and tell you nothing about how the lamp renders the single most important colour on a food image.
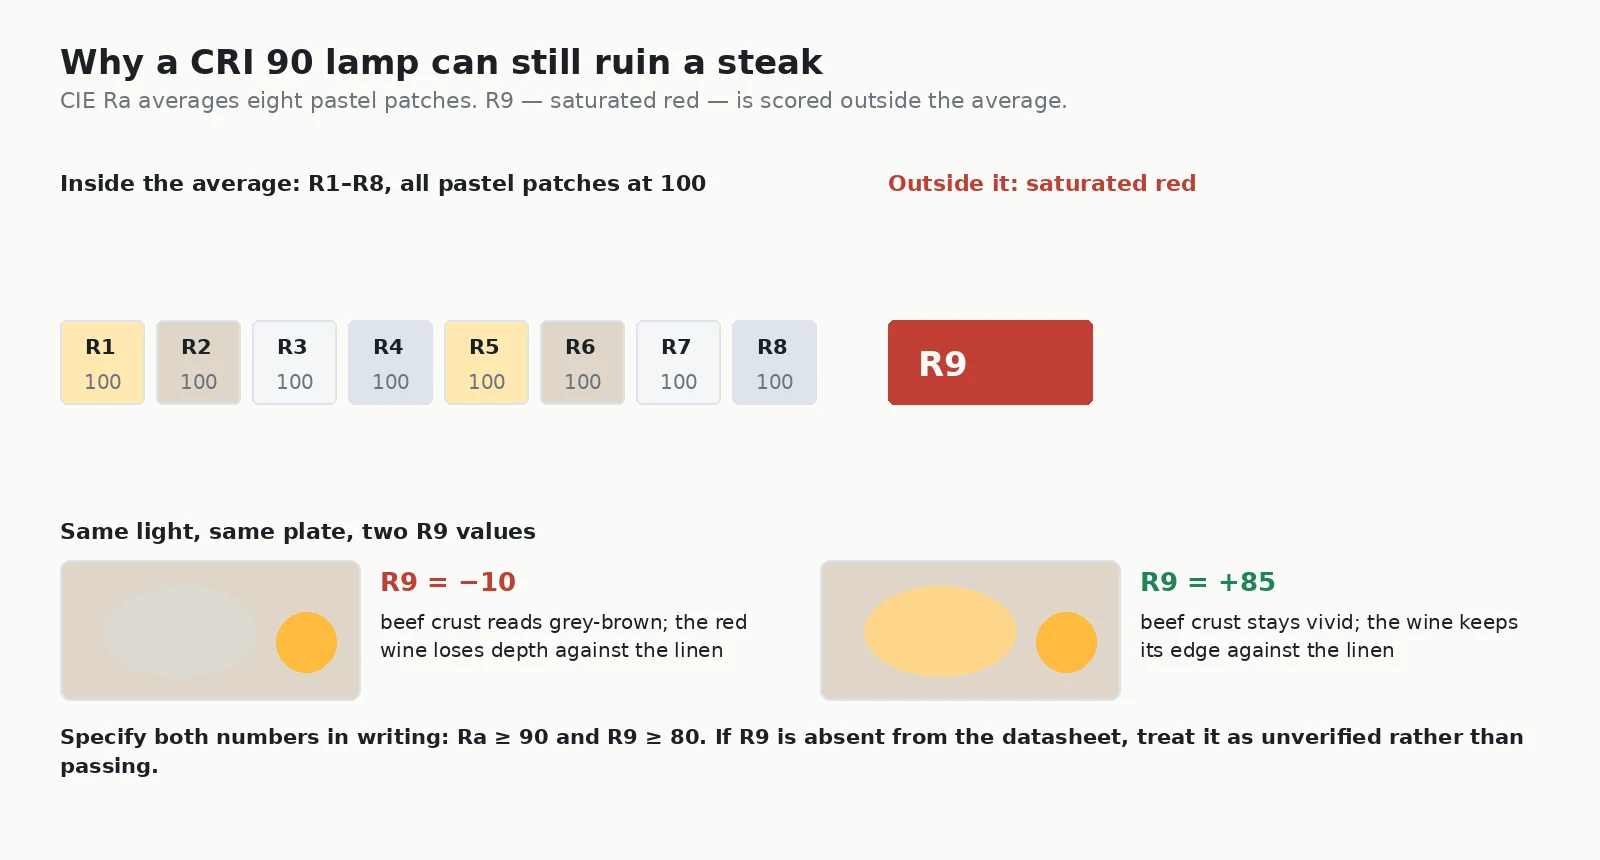
The specification consequence for a shoot is stricter than for a room. In a dining room, Ra 90 with R9 at 60 is defensible for a non-hero dish. On a photographic set it is not, for three reasons: the image will be reviewed at 100 percent on a calibrated display, the reviewer will compare it against a physical plate, and the image is permanent. The line we write into a photography brief is Ra ≥ 95 and R9 ≥ 90, with Ra 90 / R9 80 as the acceptable floor for non-hero coverage.
Why a tunable white light is a trap on set
Tunable-white systems blend two or more LED channels to reach a target CCT, and they are excellent for a restaurant that changes mood across a service. On a photographic set they introduce a variable that a still camera cannot average away. Two frames captured five minutes apart with the same settings can land on slightly different blends, and the mismatch is invisible on set and obvious across a spread.
For a shoot, fix the CCT and leave it. If the project genuinely needs both a warm hero look and a neutral catalogue look, carry two heads at two fixed temperatures rather than one tunable head, and record which one produced which frame.
Beam geometry: the four numbers that decide texture
Quantity and colour determine whether the plate is legible. Geometry determines whether it is appetising, because appetising is a texture judgement and texture is a shadow judgement. Four numbers set it.
1. Beam angle
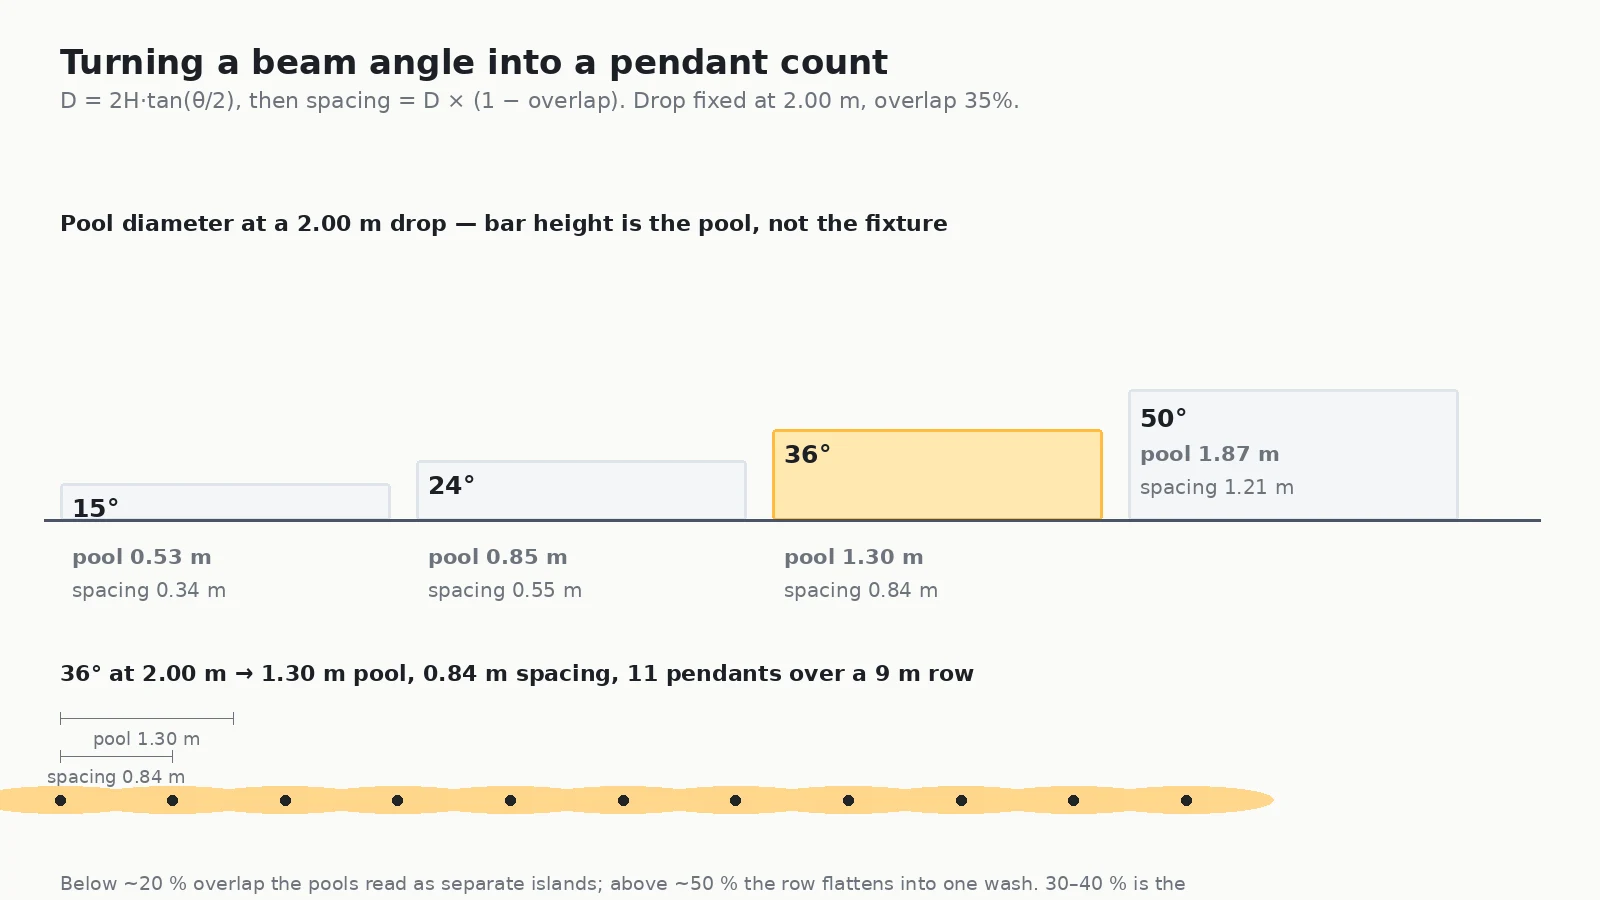
Beam angle sets the size of the pool through D = 2 × H × tan(θ / 2). At a 1.5 m throw from a head above the table, the useful opics behave like this:
| Optic | Pool at 1.5 m | At 3.0 m | What it does on a plate |
|---|---|---|---|
| 15° | 0.40 m | 0.79 m | Tight, hard-edged, high contrast — glassware, garnish, a single hero bite |
| 24° | 0.64 m | 1.28 m | Single-plate hero optic; texture reads, edges stay controlled |
| 36° | 0.97 m | 1.95 m | Group shot and two-plate coverage; softer transitions |
| 50° | 1.40 m | 2.80 m | Even fill for a full table; no directional texture at all |
2. Off-axis angle
Roughly 45° across the table is the dependable default for a plated main. It is steep enough to produce a shadow under the garnish and on the far side of the sauce, and shallow enough that the shadow falls toward the camera as shape rather than as a black hole. Push the head to 20° off axis and the plate flattens; push it to 70° and a single tall element casts a shadow across the rest of the plate.
3. Elevation above the plate
Twenty to thirty degrees above the plate surface is the band that reveals the height of a stacked element while keeping the near edge readable. Lower than 10° and the plate turns into a vertical wall; higher than 45° and the light becomes top-down and the front edge goes dark — which is exactly the failure guests recognise as “canteen” without being able to name it.
4. Fall-off across the frame
The floor of a frame is where a shoot quietly fails. A background between one and two stops below the plate separates the subject cleanly; more than two stops and the frame reads as a black void; less than one stop and the plate stops being the subject. Because a reflector near the plate bounces its own light onto everything behind it, the background almost always needs its own optic rather than spill.
Working through a shot: a hero plate at 1.5 m
Here is the sequence we would run on a single hero plate, with the numbers.
Step 1: choose the temperature from the menu, then correct for the sensor
Seared beef, red-wine reduction and charred onion: 2700K if the brand allows a warm frame, 3000K if the frames have to share a spread with cooler images. Set white balance explicitly to the chosen CCT and record it; do not leave it on auto and fix it later.
Step 2: set the primary from 45° across, 25° above, at 1.5 m
A 24° optic at that distance produces a 0.64 m pool, which covers the plate and the rim of the setting without touching the background. If the build is taller than 100 mm, step back to 1.8 m and either accept a 0.77 m pool or switch to 15° for a tighter 0.47 m pool that will define the top edge more sharply.
Step 3: add fill or an ambient layer at a 3:1 ratio
A single hard source on a plate is a lighting plan for a jewellery catalogue, not for food. Add an ambient layer or a bounce at roughly a third of the key level, positioned to open the shadow side without flattening the gradient. The three-to-one ratio is the one that keeps a sauce legible while preserving the shadow that makes the garnish look dimensional.
Step 4: check the two failure modes before you shoot
First, look for a specular highlight somewhere other than where you want the eye to land — a wet sauce, a pat of butter and any polished surface will produce one, and it is the fastest way to make a plate look greasy rather than glossy. Second, check that the background sits between one and two stops down. Both are geometry fixes, made with the head or the bounce rather than with the dimmer.
Step 5: verify, then shoot the whole menu in one pass
Test the setup on the hardest plate on the menu — the one with the most saturated red, the most reflective surface and the most height — and lock it. Then run the menu without moving the rig beyond the small adjustments each plate needs. Consistency across a menu spread matters more than the perfection of any single frame, because the reader sees them together.
Three ways a food shoot comes out wrong
Mistake 1: a warm lamp with a weak red score
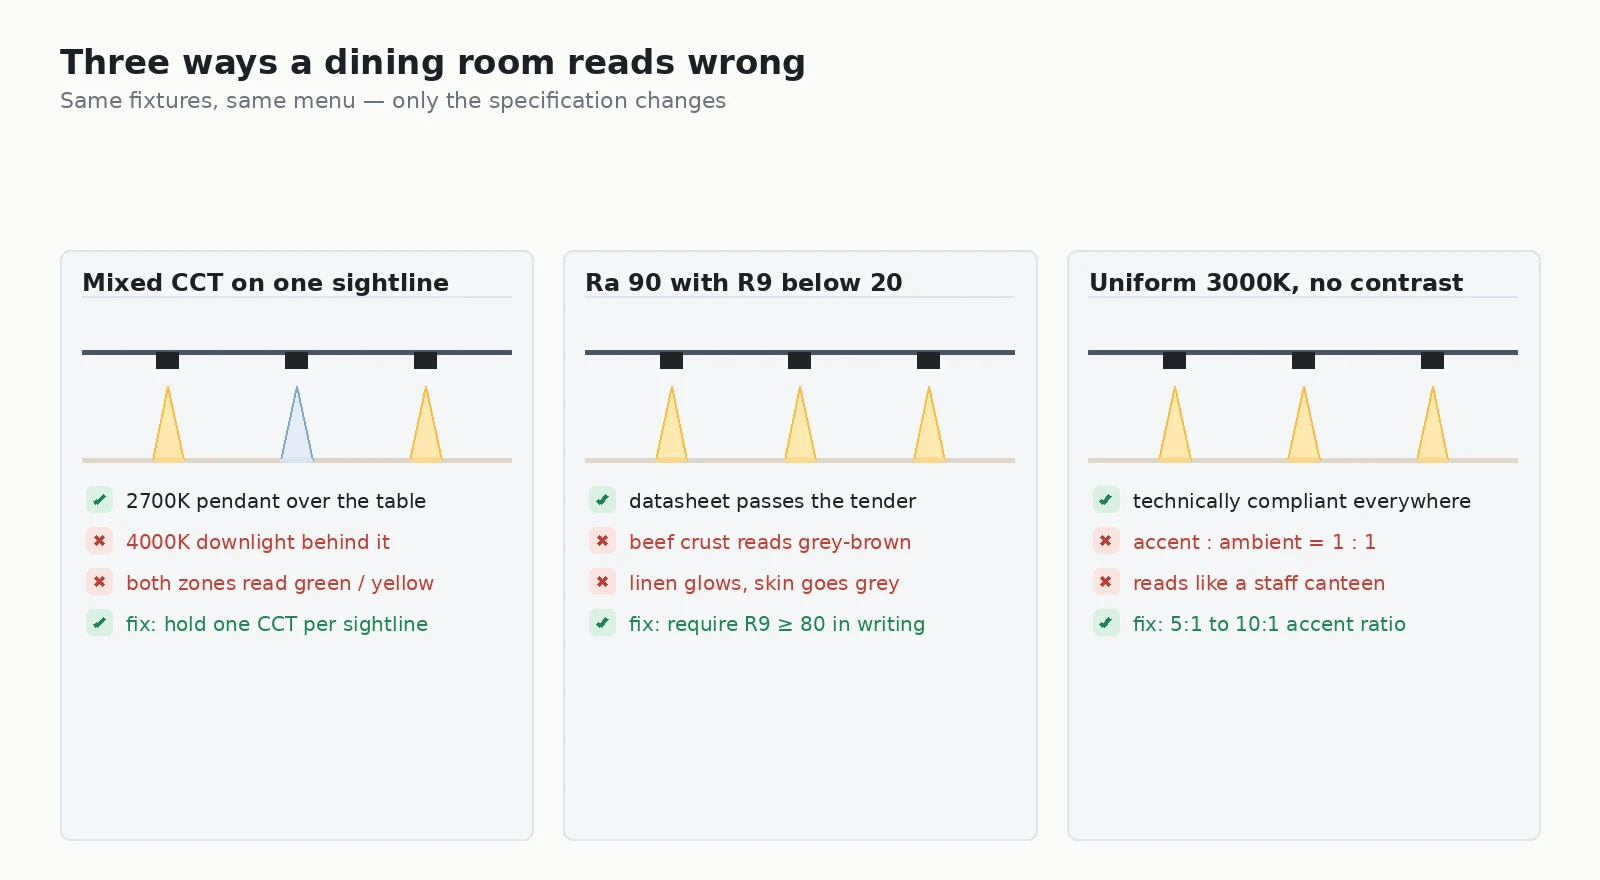
The logic feels safe — warm light flatters food — and it is exactly backwards if the lamp’s warmth comes from a broad yellow peak rather than a genuine deep-red contribution. A CCT of 2700K with an R9 of 20 will make rare beef look grey-brown, and no amount of grading recovers a colour that was never there.
Mistake 2: an unrecorded white balance
Auto white balance on a food shoot is a decision to make the correction later, in post, where it costs latitude and introduces inconsistency between frames shot minutes apart. Fix the balance, record it, and keep it fixed for the whole menu.
Mistake 3: using spill as background light
Spill is light that has already been shaped by the subject, so it arrives at the background with the plate’s shadow pattern baked in. The background then reads as a dim copy of the foreground rather than as a separate plane, and the plate loses its separation. Give the background its own head, its own optic and its own dimmer.
What the shoot can reuse from the restaurant
The cheapest and most consistent way to photograph a menu is to shoot it under the same spectrum the room serves under. A restaurant that already runs Ra 90+ / R9 80+ track heads at a fixed CCT has most of a photography rig in the ceiling; what it needs on top of that is optics that swap, dimming that does not flicker at the levels a camera can tolerate, and a way to kill the ambient layer.
Four products cover a full food-photography set.
MEGA track light 15W–20W — the primary. A 10° / 25° / 40° / 60° optic set with interchangeable clip-in filters, SDCM ≤3 and CRI 90+ / 95+. Measured output is 1291 lm at 15 W with a 10° optic, 1125 lm at 15 W / 25°, 1296 lm at 15 W / 40° and 1136 lm at 15 W / 60°, rising to 1748 lm at 20 W / 10°, all at 3000K CRI 90+. The 10° and 25° reflectors are the hero-plate optics; the 40° covers a two-plate frame. The clip-in filter set is what makes it a photographic tool rather than just a display head, because a honeycomb or a diffuser changes the specular behaviour without moving the rig.
The room is already the rig. A restaurant that runs Ra 90+ / R9 80+ heads at a fixed CCT has most of a photography setup in the ceiling; what it needs on top is optics that swap without tools, dimming that does not flicker at camera shutter speeds, and a way to kill the ambient layer.
VEGA-Premium 30W — the harder-working fill or key when a taller build needs more distance. A 24° / 30° / 40° / 52° optic set at 30 W, SDCM ≤2, static white 2700K to 4000K with tunable white from 2700K to 6500K as a separate option, and measured output of 3809 lm at 24°, 3828 lm at 30°, 3861 lm at 40° and 3679 lm at 52° at 3000K CRI 90+. SDCM ≤2 is the number that matters in a spread: two heads from the same batch will not drift apart in colour across a sixteen-shot menu.
OVEGA-Projector 10W–25W and IMAX-Projector 10W–20W — the background and prop layer. Four adjustable framing blades cut a hard-edged pool in a chosen shape, with a 20°–40° zoom on OVEGA-Projector and controllable soft or hard focus on IMAX-Projector. The OVEGA-Projector is measured at 678–696 lm at 10 W, 936–953 lm at 15 W and 1288–1482 lm at 20–25 W with CRI 90+; the IMAX-Projector at 805 lm at 18° and 722 lm at 36° at 3000K CRI 90+, with UGR below 6. These are the heads that light a textured board, a menu card or a linen backdrop without spilling onto the plate.
SLEM 2.4in linear light system — the flat, even layer for overhead shots and for any frame where a symmetric gradient would fight the composition. Modules run 2, 4 and 6 ft at 20, 40 and 60 W in a PC diffused 100° or a louvred 60° distribution with UGR below 10, and they join in L, X and T configurations without tools. For a top-down menu shot it is the difference between a plate lit from a point and a plate lit from a plane.
For beverage, glassware and back-bar work, the motorised MOVIA motorized track light 30W adjusts pan 0°–360°, tilt to ±140°, zooms 18°–60° and tunes 2700K to 6000K at 0–100 percent from a desk — genuinely useful when a shoot is being fine-tuned between takes rather than around them.
Post-processing has a ceiling, and the light sets it
Grading can lift a plate that was shot 150 K off the intended white balance and half a stop dark. It cannot invent saturated red that the lamp never delivered, and it cannot recover a blue channel that clipped while the plate was on the table. That asymmetry is the whole reason to spend money on the light rather than on the retouching.
The corollary is worth stating for anyone specifying a restaurant as well as a shoot: the same limit applies in the dining room, because the guest photographs the plate with a phone long before a professional camera arrives. Every menu image on a review site was produced by whatever spectrum was in the ceiling at that moment. Lighting the room correctly is also, quietly, a content strategy — the argument we make from the room side in restaurant track lighting design, and from the standard side in lux vs lumens.
Frequently asked questions
Is 2700K or 3200K better for food photography?
2700K is the warm, restaurant-like look: more relative power at 660 nm, richer reds and a candlelit feel, best for meat, red wine, caramel and baked goods. 3200K is closer to neutral white, separates greens and cold plates better, and is the safer choice when a camera is involved, because it leaves more headroom above the blue channel before clipping. If the shoot has to match a warm dining room and stay gradeable, 3000K is the compromise that flatters the plate and the sensor at the same time.
What CRI do I need for a food photography light?
Specify CRI Ra 90 minimum and R9 of at least 80 as two separate numbers, stated in writing. Ra is the average of eight pastel test patches and excludes saturated red entirely, which is precisely the colour that carries beef, salmon, tomato and red wine. For hero shots and any shoot where packaging has to match the plate, CRI 95+ with R9 above 90 is worth the premium. If a datasheet omits R9, treat the lamp as unverified.
Why does my food look grey in the photo when it looked fine on set?
Two causes, and they are worth separating. If the monitor is uncalibrated, the problem is the review display rather than the light. If the monitor is calibrated, the usual cause is a lamp with a strong red content but a weak blue and green channel, so the camera has to brighten the whole frame and the plate desaturates. The fix is not more light; it is a broader, better-balanced spectrum at the same illuminance, ideally CRI 95+ with R9 above 90.
What beam angle should I use to light a plate?
For a single hero plate at a 1.5 m throw, a 24 to 36 degree optic, positioned at roughly 45 degrees across the table and 20 to 30 degrees above the plate, gives light with visible texture and a gradient that reads as depth. A 15 degree spot at the same distance goes tight and hard, which is useful for glassware and terrible for sauce. For a group shot, step up to a 36 to 50 degree symmetric head with the accent-to-ambient ratio held near 3:1.
Do I need a color meter, or is a grey card enough?
A grey card in the frame and a calibrated monitor will get you most of the way, and both are essential. A colour meter adds CCT and CRI verification on set, which matters when you are matching a plate to packaging shot weeks earlier in a different room. If you can only buy one thing, buy the calibration, because a camera that is corrected against a known neutral reference removes most of the drift between shots.
Should the background be darker or lighter than the plate?
A background between one and two stops below the plate is the dependable default: dark enough that the subject separates, light enough that it does not read as a black void. Reflective surfaces need more separation than matte ones, because the reflections carry their own false highlights. Light the background as a separate decision, with its own optic, rather than letting spill from the plate light hit it.
Can I use the same track heads for the dining room and for the shoot?
Often yes, and it is the cheapest way to keep the two consistent. The requirement is that the heads carry a fixed spectrum rather than a tunable one, that the optics swap without tools, and that the dimming is flicker-free down to the level you shoot at. Encore track and cylinder heads are specified in the same CCT, CRI and R9 families for exactly this reason, so a restaurant can shoot its own menu under the light it actually serves under.
Specify the light, then shoot the menu
Work in this order: choose the CCT from the menu and the frame, correct for the sensor by stepping one step cooler than the room if the images have to be graded, write Ra ≥ 95 and R9 ≥ 90 as two numbers, fix the beam from the build height, and set the key at 45° across. Then lock the rig and run the whole menu in one pass. The light is the only part of a food image that cannot be repaired afterwards, so it is the part worth getting right first.
Encore manufactures track, cylinder and linear systems in fixed CCT, CRI and R9 families, which means a restaurant, a studio and a test kitchen can be specified from one standard. The track lighting range covers the key and background layer; the linear light range covers overhead and flat fill; and the cylinder light range covers surface-mounted and wall-wash positions.
Send us the menu, the build heights and the camera plan, and we will return a shoot-ready specification: CCT and white balance per shot, Ra and R9, optic per frame, key angle, background level and a dimming range that will not flicker on camera. Talk to the Encore specification team.