
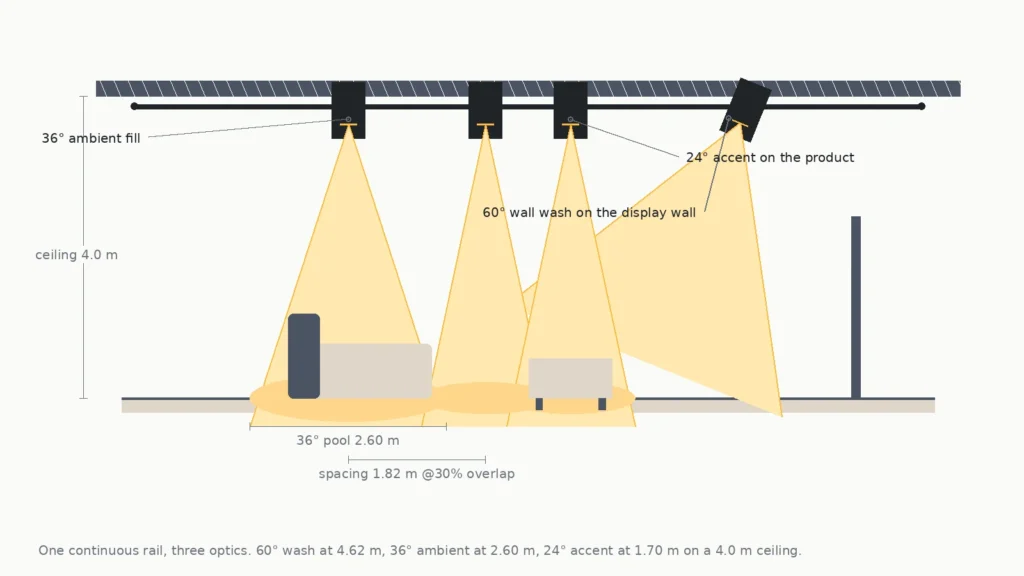
Showroom lighting has three jobs that pull against each other: make the product’s colour true, cover the floor evenly enough that nothing is missed, and hide the hardware well enough that the ceiling reads as architecture rather than as a parts list. This guide treats showroom track lighting as a three-way engineering problem — colour, coverage and conceal — and gives the numbers for each. It is written for dealer showrooms, furniture and material showrooms, brand experience spaces and automotive showrooms where the client walks the floor and judges everything by eye.
The short version, before the physics: 3000K for furniture, stone, tile and materials; 3500K for automotive and electronics; CRI Ra ≥ 90 with R9 ≥ 50 held to a 3-step ellipse; a 3:1 to 5:1 accent-to-ambient ratio; and one continuous line of tracked light rather than a field of holes. Everything below is how those five numbers are derived rather than guessed.
If you are still deciding on the hardware family, our commercial track lighting guide covers system selection, and exposed track lighting and wall wash covers what happens when the track is deliberately left visible. This article assumes the track is being used as a tool and the client is judging the merchandise.

What a showroom actually has to do
A showroom is not a shop and not a museum. A shop is optimised for attention, a museum for preservation, and a showroom for comparison. The visitor is deciding between two sofas in the same fabric, two stone slabs from the same quarry, two paint colours from the same fan deck. That single fact drives every specification decision that follows.
Comparison means consistency. If two adjacent sofas sit under light of different colour temperature, angle or intensity, the visitor does not conclude that the lighting is uneven. They conclude that the products are different. Every specification mistake in a showroom therefore shows up as a merchandising error, and gets blamed on the product.
| Requirement | What it protects | Failure looks like |
|---|---|---|
| Accurate colour | The material decision | Customer buys the sample, rejects the delivered slab |
| Even vertical coverage | Perceived range and quality | Dark ends of the room read as “clearance” |
| Controlled glare | Comfort and dwell time | Visitors squint, then leave early |
| Concealed hardware | The brand’s finish level | Ceiling looks industrial when the brand is premium |
| Re-aimability | Next season’s layout | Every planogram change needs an electrician |
The colour decisions, taken in order
Colour is the first thing to fix, because it is the only one of the three that cannot be corrected after the fixtures are ordered. Get the sequence wrong and the rest of the project is spent compensating.
Step 1: pick the CCT from the merchandise, not from the brand book
Every material has a colour temperature band in which it looks most itself. Choosing outside that band does not make the product look dramatic, it makes it look wrong — and the visitor has no way of knowing that the light, not the sofa, is at fault.
| CCT | Showroom type | Why |
|---|---|---|
| 2700K | Antique, reclaimed timber, heritage reproduction | Preserves the amber and gold in aged finishes |
| 3000K | Furniture, upholstery, stone, tile, kitchen and bath | Neutral enough for white and grey, warm enough for timber and leather |
| 3500K | Automotive, consumer electronics, white goods | Separates the cool metallics and paint whites those products rely on |
| 4000K | Material libraries, sample walls, back-of-house comparison areas | Best colour separation for small-format samples viewed close up |
Step 2: write the colour spec as four numbers, not one
“CRI 90” on a datasheet is a single number standing in for eight, and it excludes the ninth. CIE Ra averages R1 through R8, all pastel patches. The saturated red patch, R9, is scored separately and left out of the average. In a showroom showing timber, leather, terracotta, brass and wine-coloured upholstery, R9 is doing more work than the eight patches combined.
Add colour consistency, and the specification becomes four numbers:
- CRI Ra ≥ 90 for general showroom floors, Ra 95+ for material sample walls.
- R9 ≥ 50 minimum; R9 ≥ 80 wherever red, timber or leather is being compared.
- TM-30 Rf ≥ 88 with Rg between 95 and 102. Rg below 95 flattens saturated colour; Rg much above 105 oversaturates it and makes the product look better than it is, which produces returns rather than sales.
- SDCM ≤ 3 steps across every head on the floor. Above 3 steps, two heads of the same nominal 3000K visibly disagree, and adjacent products start to look like different products.
For a deeper treatment of how Ra and R9 can diverge — and what an R9-weak lamp does to white surfaces containing optical brighteners — see our 2700K vs 3000K spectrum analysis, which works through the same physics on a table setting.
Step 3: fix the accent-to-ambient ratio before choosing wattages
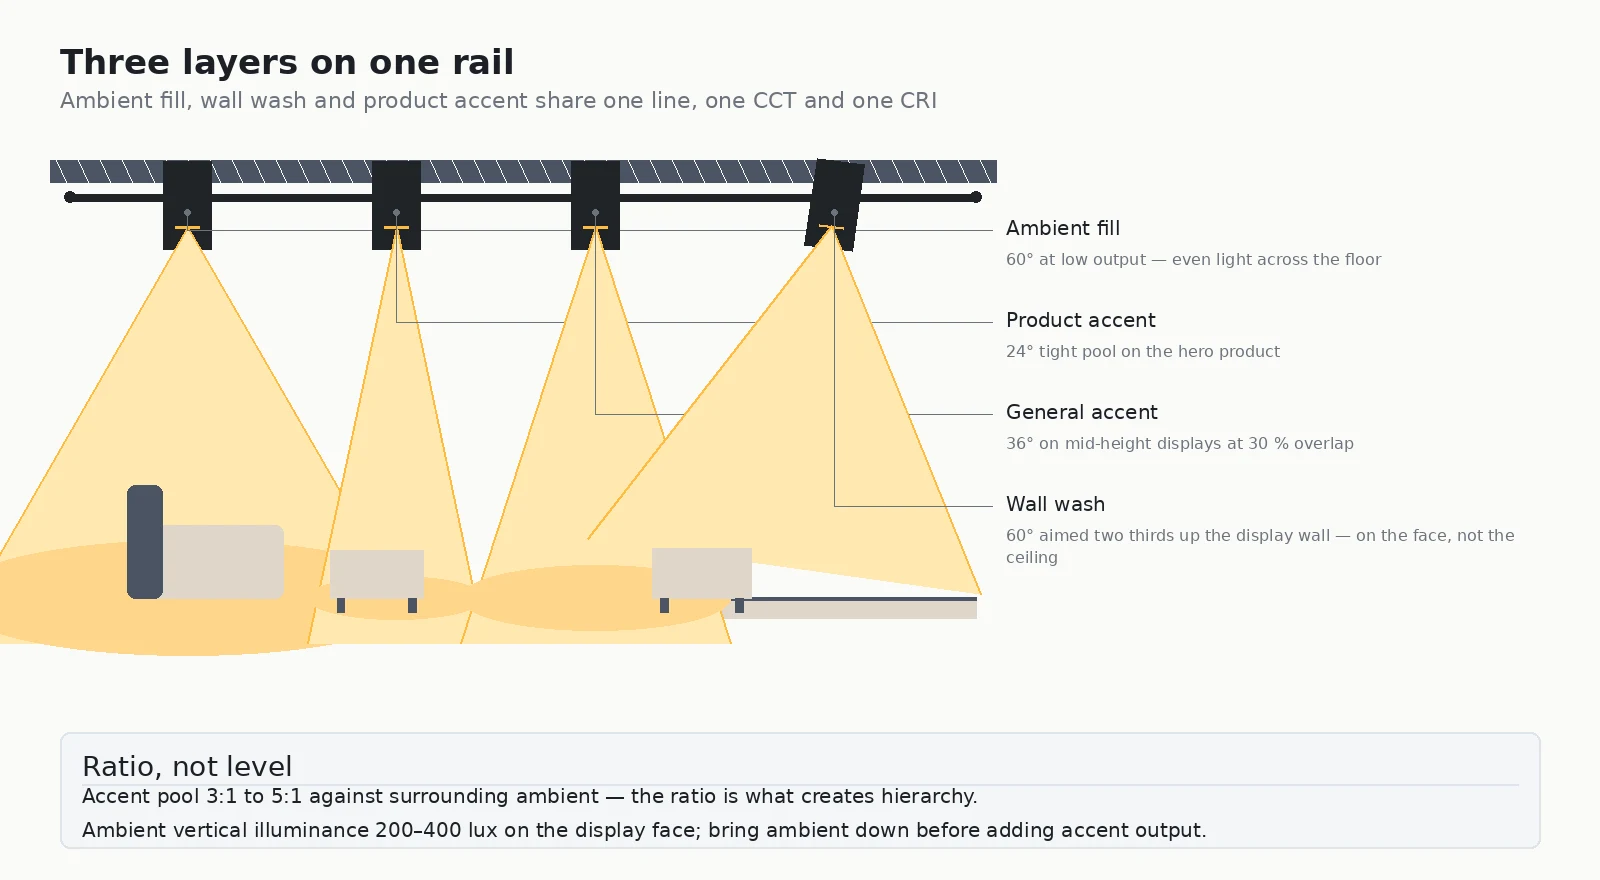
A showroom with uniform brightness has no hierarchy, and a visitor with no hierarchy of attention walks the aisle instead of the product. Commercial practice converges on a vertical illuminance of roughly 200 to 400 lux on the shelving and display faces, with 3:1 to 5:1 between the accent pool and the surrounding ambient. The underlying lux targets by space are set out in commercial lighting lux requirements; the showroom-specific rule is that the ratio matters more than the absolute level.
Coverage: turning beam angles into a floor plan
Coverage is arithmetic, and it is the part of the project most often finished by eye on site. Run it before the fixtures are ordered and the room evens out on paper.
The only formula you need
The diameter of the pool a head throws is D = 2 × H × tan(θ/2), where H is the vertical distance from the head to the surface being lit and θ is the beam angle. Below is the working for the three heights that cover almost every showroom: a 3.0 m retail ceiling, a 4.0 m double-height showroom and a 6.0 m furniture hall.
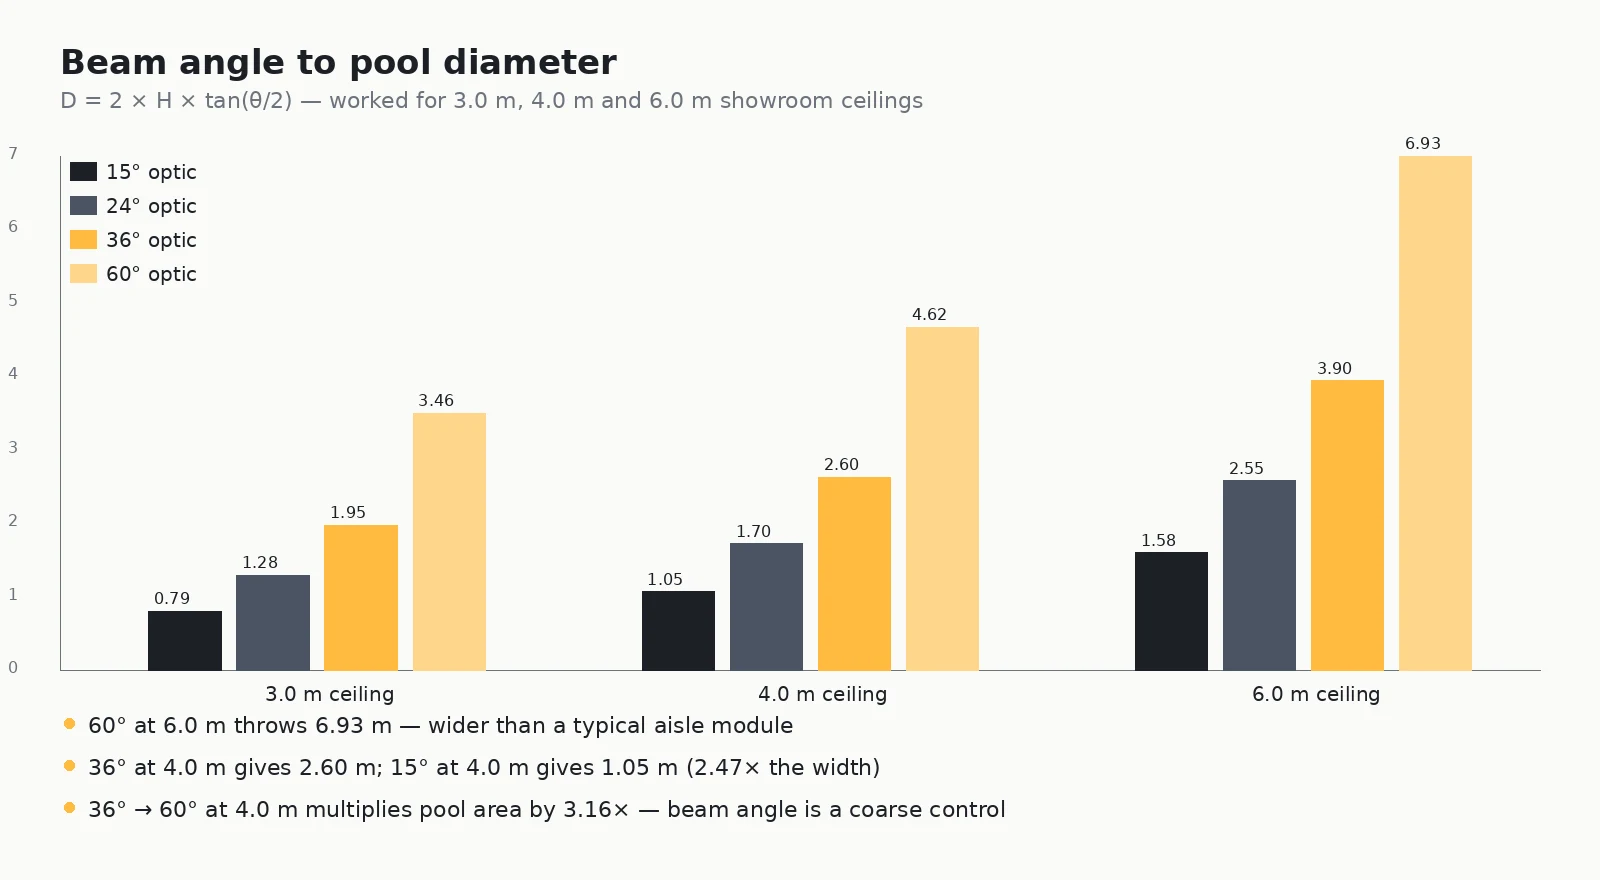
Two readings fall straight out of that chart. First, a 60° head at 6.0 m throws a 6.93 m pool — wider than most aisle modules, which is why high showrooms that reach for wide optics end up washing the floor and the neighbouring bay together. Second, the jump from 36° to 60° nearly triples the pool area. Beam angle is a coarse control; if the pool is close but wrong, the fix is usually height or spacing, not a different optic.
Spacing: overlap on purpose, not by accident
Two adjacent pools should overlap by roughly 30 percent, which is what turns a row of circles into a continuous band of light along a wall or an aisle.
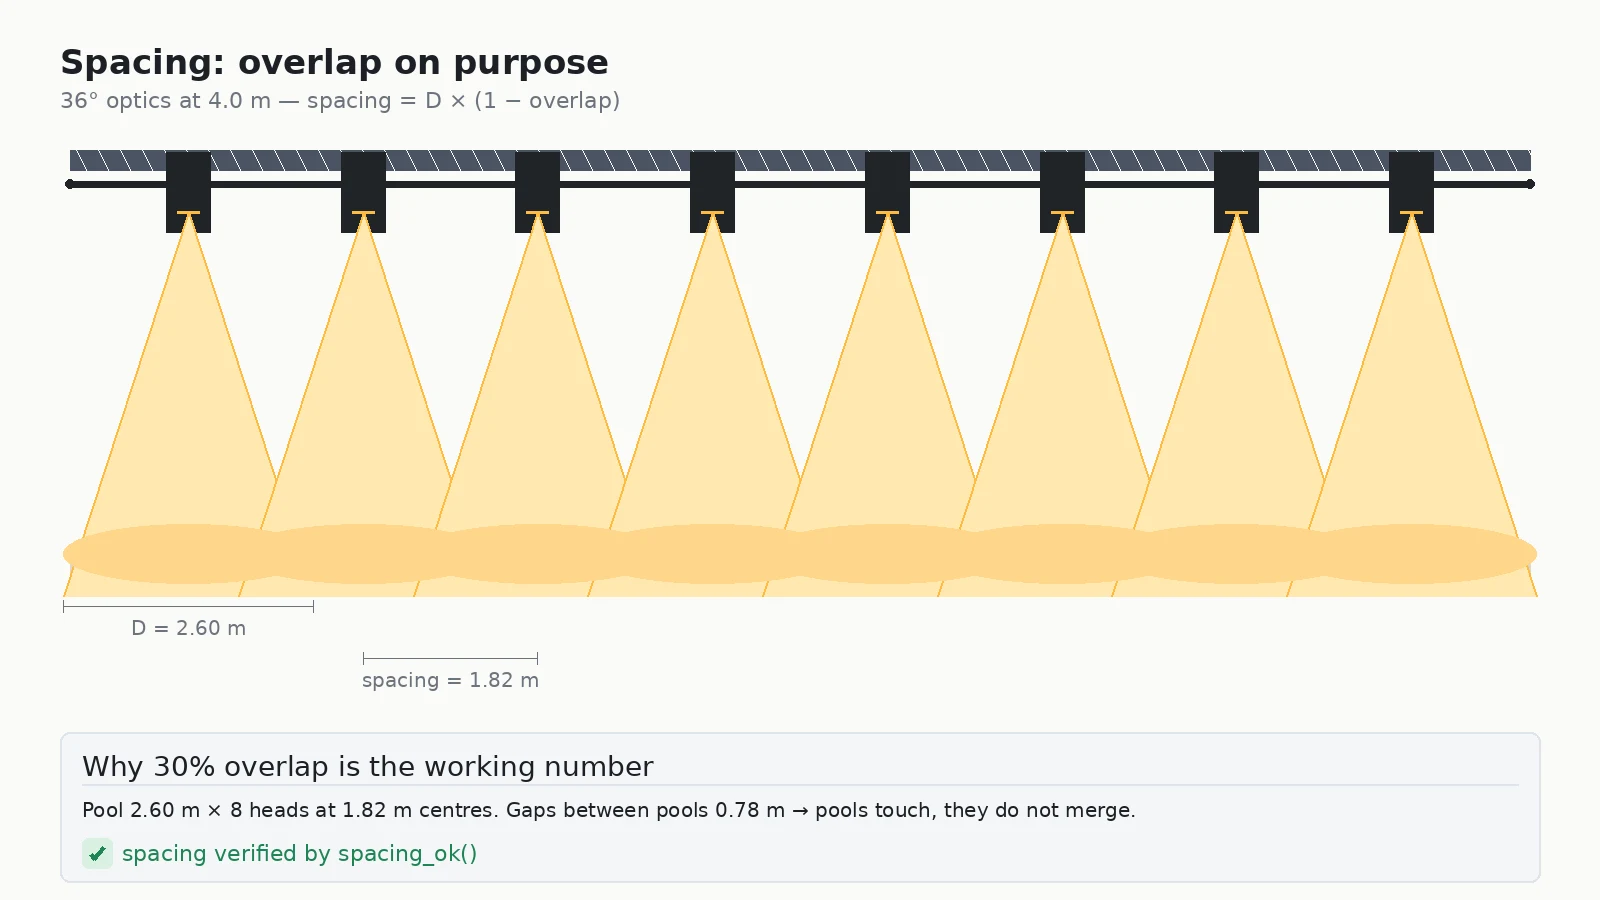
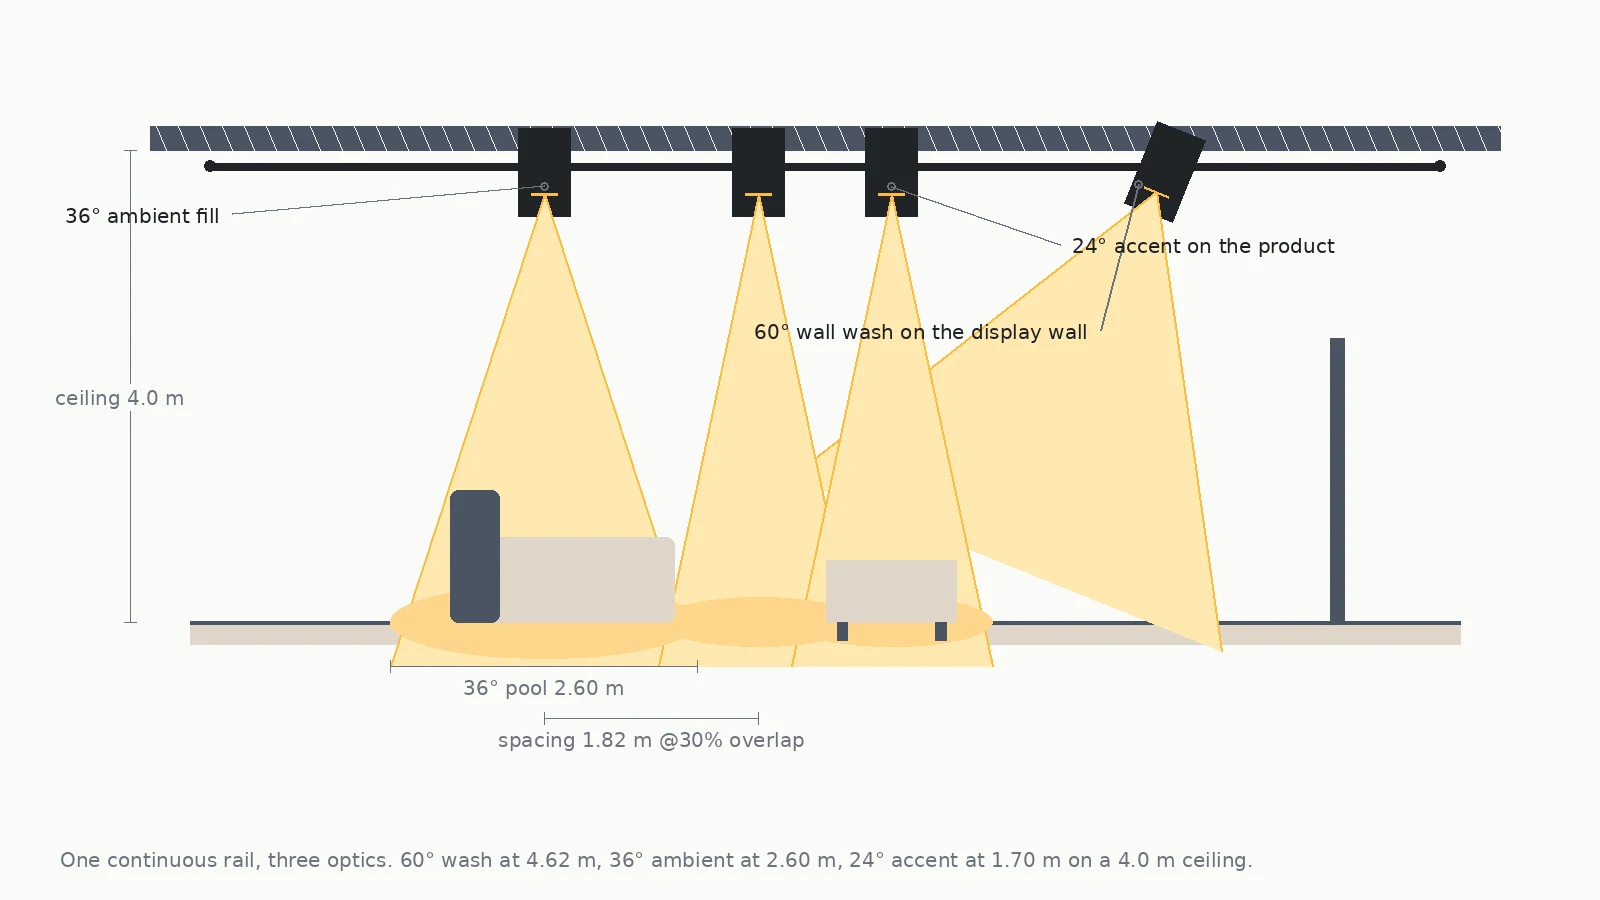
The formula is spacing = D × (1 − overlap). At 4.0 m with a 36° optic, D is 2.60 m and a 30 percent overlap gives 1.82 m centres. Divide the wall length by that and the head count falls out: a 12 m display wall needs seven heads, not the eleven that a 1.0 m guess produces.
There is a trap here worth stating plainly. Increasing the overlap tightens the spacing, and tightening the spacing increases the head count and the connected load. The track lighting range lists the per-model wattages needed for that load check; our 25W AIMER and 30W CADIO heads run 2,299 to 2,987 lumens, which is the data you need before the circuit is drawn.
Throw distance is a second, separate budget
Spacing gets the light onto the right surface. Throw distance decides whether it arrives with enough punch, because illuminance falls with the square of the distance.
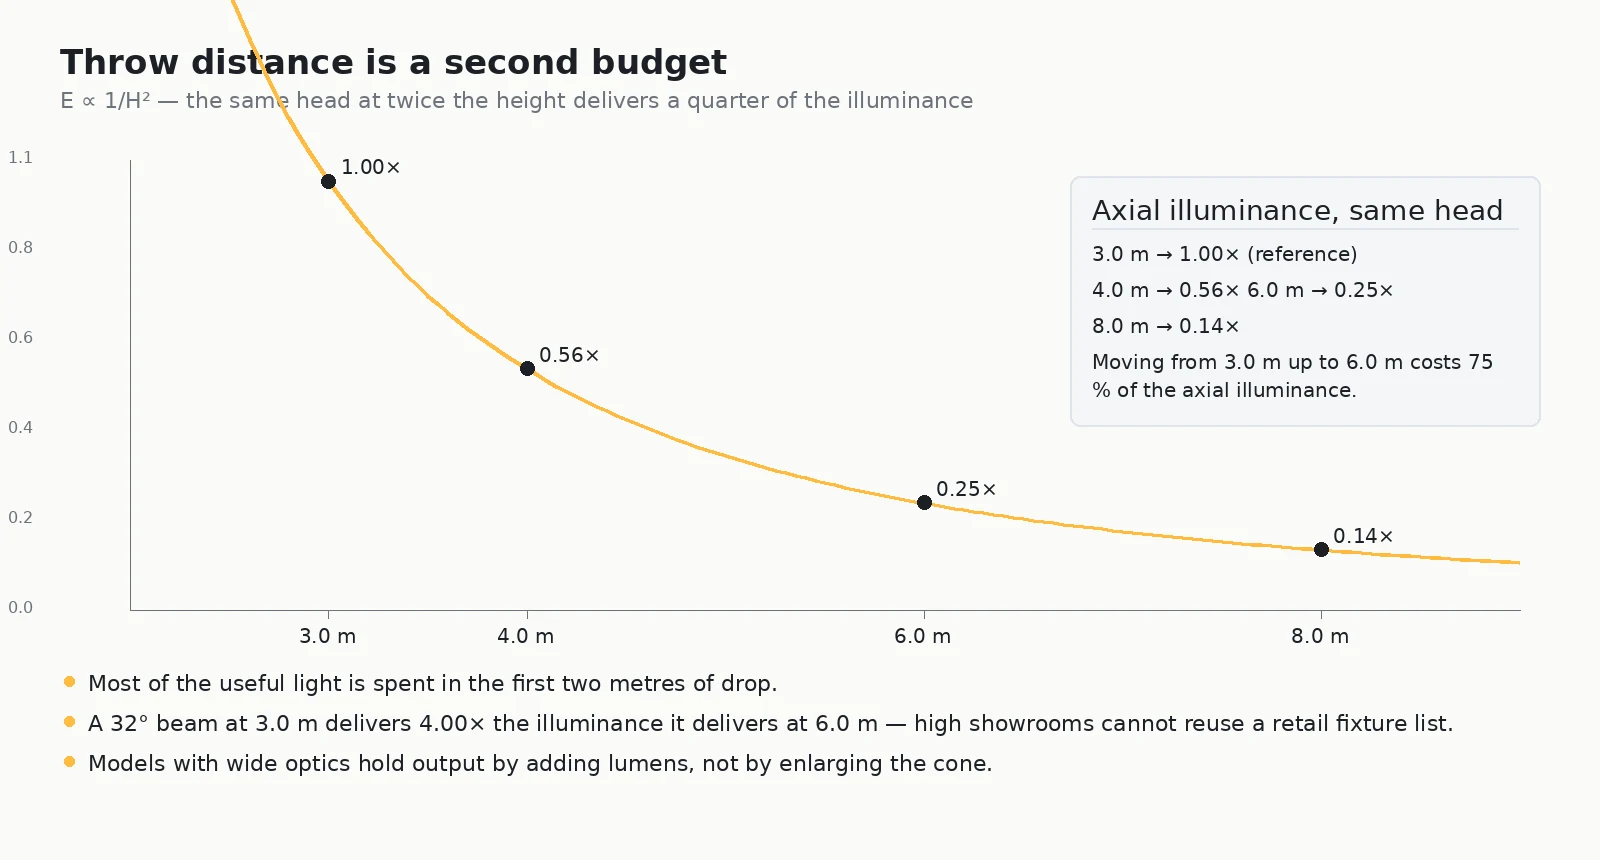
On a 32° beam the axial illuminance at 3.0 m is 2.69 times what the same head delivers at 6.0 m. The curve is not a subtle gradient: most of the useful light is spent in the first two metres of drop. This is the reason a high-bay showroom cannot be specified with the same fixture list as a retail showroom ceiling, and the models that carry the wider optics do so by putting out more lumens rather than by enlarging the cone.
Mounting height, three ways
Where the track sits is the single lever that changes all three of the constraints above at once.
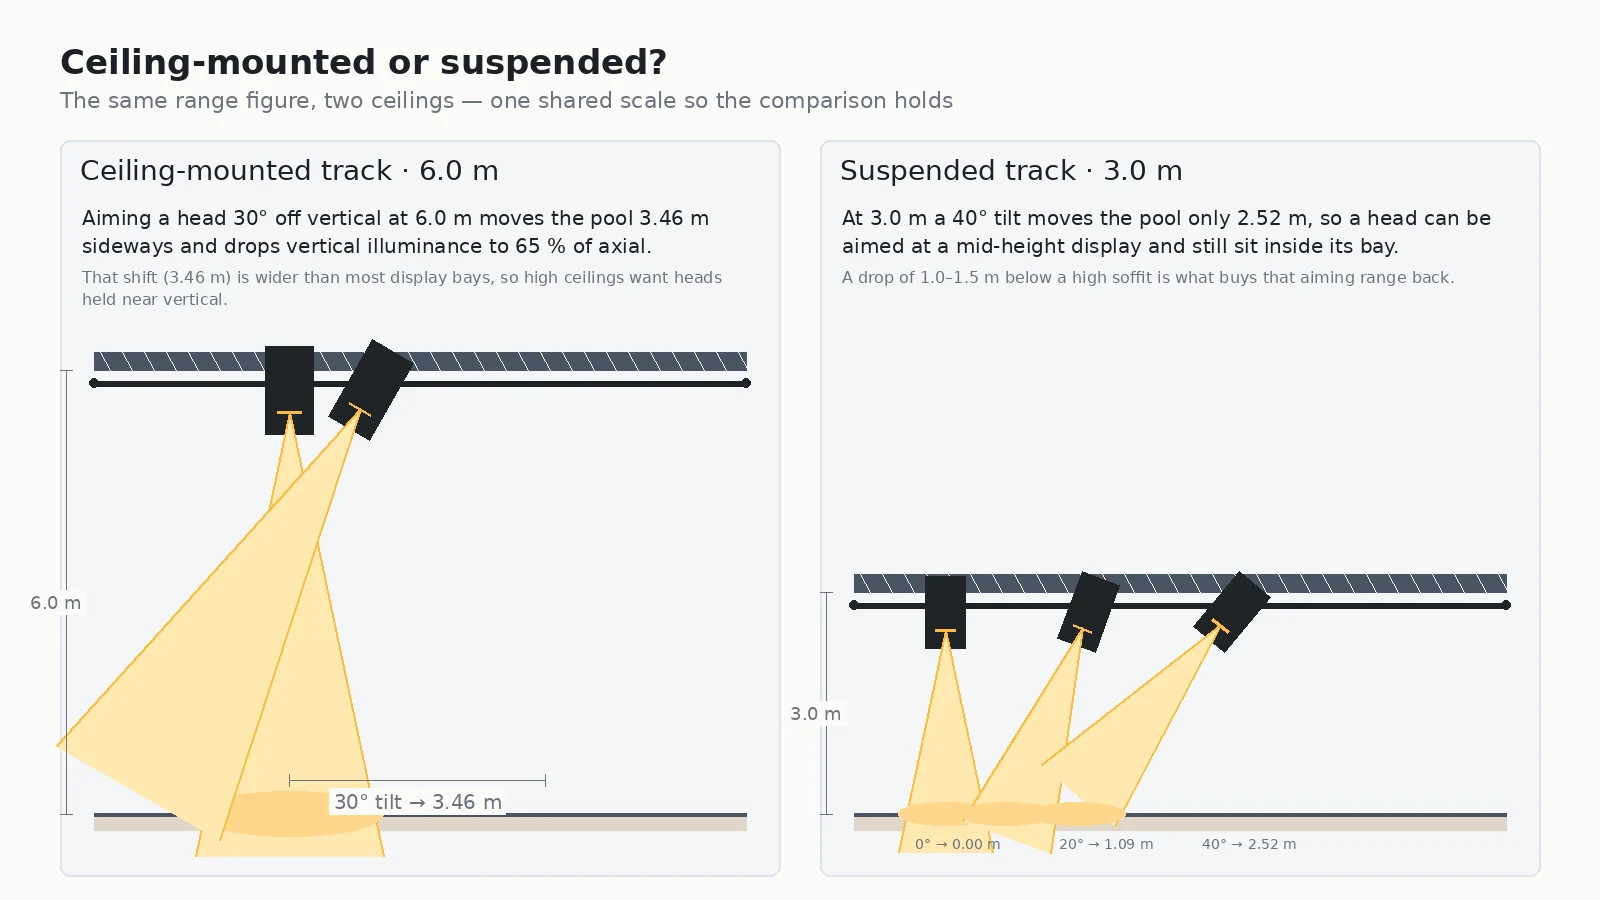
At 6.0 m of drop, tilting a head to 30° moves the pool 1.63 m sideways, and its vertical illuminance falls to 65 percent. So high ceilings favour heads that stay close to 90° and do their work vertically; mid-height showrooms favour drops and tilting; and retail ceilings want the track as close to the product as the architecture allows. If the ceiling is genuinely high, the patterns in high ceiling lighting apply before the tracking is drawn.
The conceal problem: why linear and track beat a field of holes
Now the third of the three jobs, and the one that decides whether the finished showroom looks designed or merely equipped.
The default answer for a showroom is a regular grid of recessed downlights. It has advantages — nothing hangs into the space, no hardware to aim — but in a showroom it fails on three counts. A grid cannot be re-aimed when the planogram changes. A grid produces scalloping on the wall above the first line of displays. And a grid has no line for the eye to follow, so the ceiling reads as perforated rather than composed.
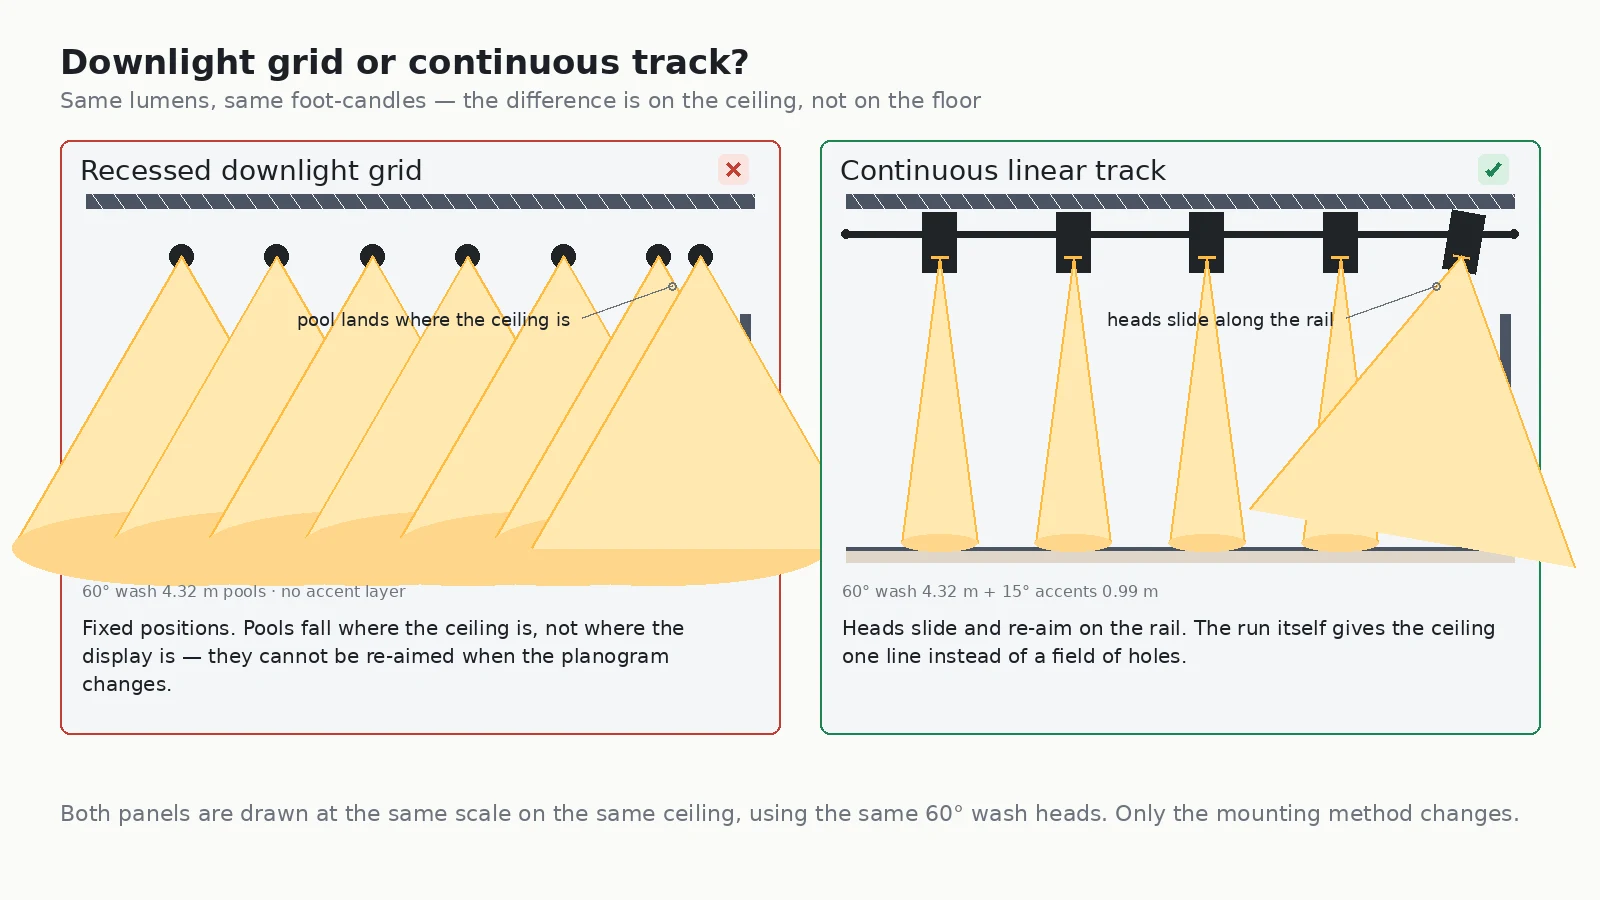
A continuous track or linear run solves all three at once. Coverage stays even because the line can be populated to the spacing from the previous section. Aiming stays adjustable because the heads relocate along the run. And the run itself — a single straight line aligned with the display module — is a visual element that the eye reads as intentional.
The layered version is the one that gets specified on real projects. Ambient comes from a broad 60° optic or from a linear diffuser at low output, wall wash comes from a dedicated asymmetric head aimed two thirds up the display wall, and the product itself is picked out by a 15° to 24° accent head. All three share one line, one CCT and one CRI, which is what makes the ceiling read as a single design decision.
Do we have the mechanics? A real installation
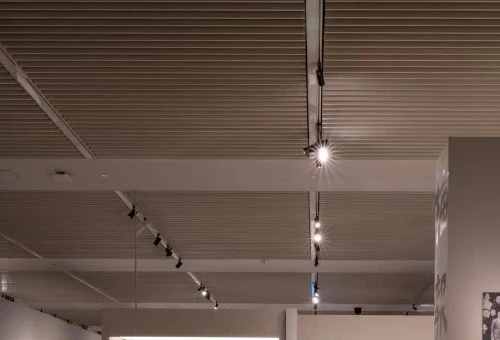
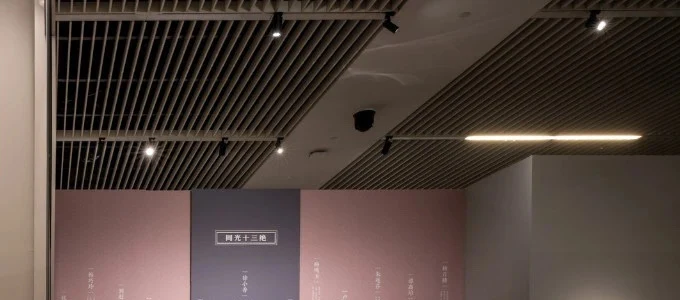
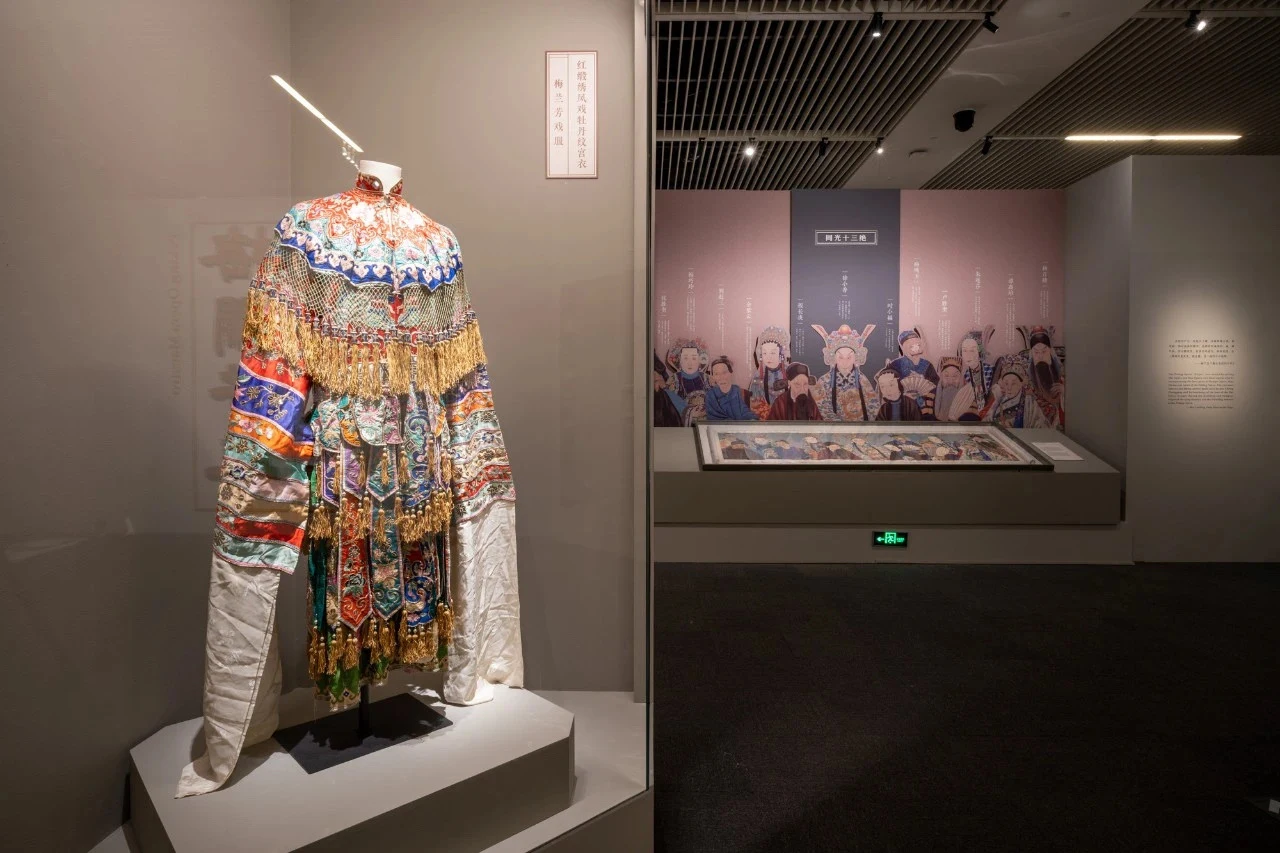
Concealment is a mechanical question as much as an optical one, and the details are easier to see than to describe. The photographs below are from a completed exhibition fit-out in Shenzhen, shot in 2024 on a Fujifilm X-T4 with the 18–55 mm kit lens at f/4, and show what the ceiling actually looks like when the brass is designed to disappear.
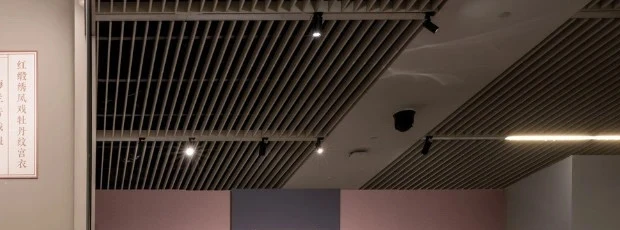
Two things are doing the concealment work here. The rail is handrail white and set in the plane of the baffles rather than hanging below them, so the baffle shadow line hides the rail profile from most viewing angles. And the linear run is a single continuous diffuser, which means no visible joints, no end caps to line up and no gaps to read as a fault.
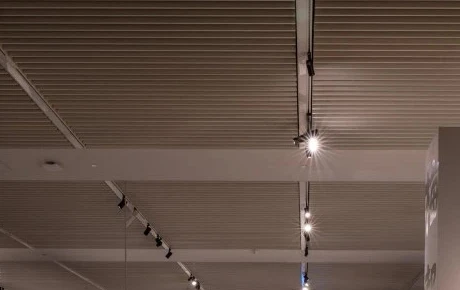
This is the practical argument for track in high-end showrooms. The heads are not hidden — they are visible and clearly mechanical, which is honest — but they are thin, black against a dark baffle, and aligned along one line. The aim of each head was set on site after the planogram was built, which is the capability the downlight grid cannot offer.
Anti-glare is part of the conceal brief
Visitors look at products, and products are low. At head height, a fixture on a 4.0 m ceiling at 30° off vertical sits inside the field of view at roughly 25°. Without control, that is the single most common reason visitors describe a showroom as tiring, and why dwell time drops in the second half of the floor.
The specification that prevents it is straightforward: UGR ≤ 19 on the general floor, UGR ≤ 16 on any head within 30° of a main sightline, and UGR < 10 where the head is mounted below eye level or close to a mirror-finish product. Our EVO family is specified with a deep anti-glare reflector for exactly this reason, and the IMAX-Projector holds UGR below 6 while cutting a shaped beam. Both approaches are covered in retail display lighting, where the same glare geometry is worked through for a store floor.
Three ways a showroom comes out wrong
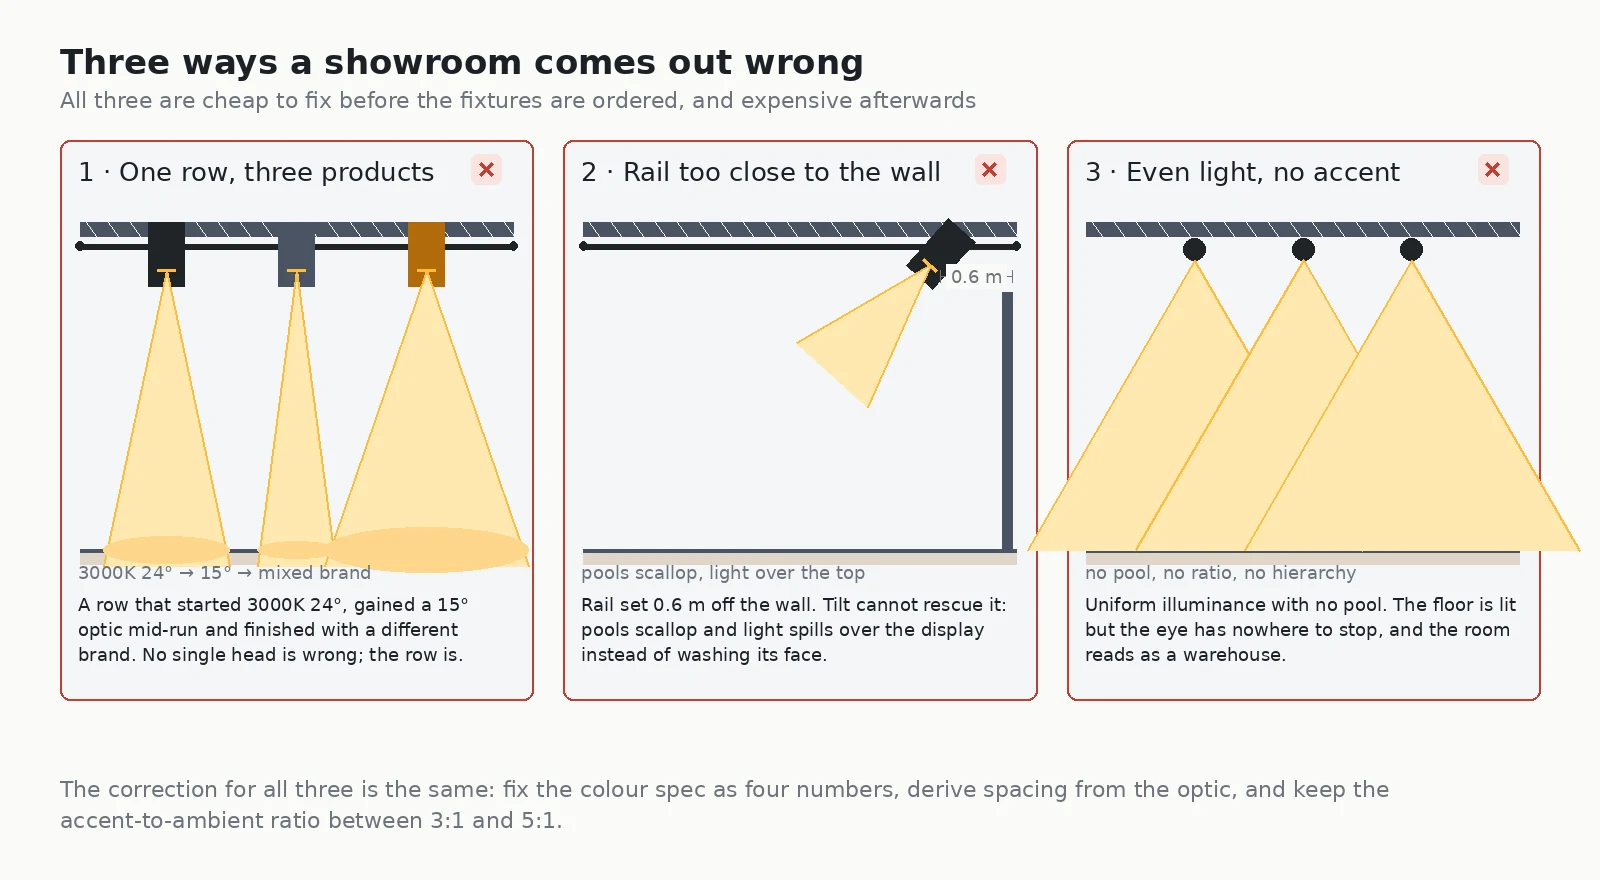
Mistake 1: one row, three different products
A single display row that started with 3000K 24° heads, gained a 15° optic halfway along, and was finished with a different brand of head at the end. No single head is wrong; the row is. Every one of those heads was probably added at a different budget cycle, which is why the fix is a rule rather than an inspection: one row, one part number, CCT and SDCM verified as a batch.
Mistake 2: track too close to the display wall
Setting the rail 0.6 m off the wall and then tilting the heads produces scalloped pools and light that spills over the top of the display instead of washing down its face. Either the rail moves out to 1.2 to 1.5 m and the heads aim back at the product, or the wall gets a dedicated asymmetric wash head. There is no tilt angle that rescues the wrong rail position.
Mistake 3: even illuminance with no accent layer
A visually uniform floor with no contrast and no pools reads as a warehouse because there is a footprint to walk but nowhere for the eye to stop. The correction is the ratio, not the level: bring the ambient down, leave the accent where it is, and the product separates from its background without any additional power.
Working through an automotive showroom
Automotive is the case that punishes every assumption, so it is useful as a check. A 5.0 m ceiling, a 3.84 m light line, and a vehicle whose paint, chrome and glass sit within 2 m of each other at every viewing angle.
The paint problem
Automotive paint contains metallic flake whose sparkle comes from specular reflection, and a broad beam delivers that reflection from every direction at once. The result is a car that reads as uniformly flat under light that flatters every other product in the building. The specification that fixes it is 15° to 24° optics at 3500K, which is the CCT band where the cool metallics and the white and silver paints separate rather than merging.
The glass and vinyl problem
The second constraint runs the other way. Glass and interior vinyl are highly polarising surfaces, and a narrow beam aimed at a steep angle puts a hot reflection into the driver’s line of sight from the most common viewing position. The fix is geometric rather than optical: keep the accent heads close to vertical over the vehicle and let the pool centre rather than the beam edge fall on the surface.
The numbers
At 5.0 m with a 24° optic, each head throws a 2.13 m pool. Spacing that at 30 percent overlap gives 1.49 m centres, so a 3.84 m line carries three heads rather than the two that fit by eye. Those three heads then hold a 4:1 accent-to-ambient ratio across the bay without any change to the ambient layer. This is the same arithmetic as the furniture hall earlier in the article — only the merchandise changed.
The fixtures that do this work
Everything above resolves into a short list of mechanical requirements: a continuous rail, narrow and medium accents, one asymmetric wash head, anti-glare control, and a colour specification that holds across the batch. The range below is built along those lines.
IMAX-Projector 10–20W — the component that solves the conceal problem
This is a framing projector, and it is the single most useful tool in a showroom where the display geometry is irregular. Four adjustable blades cut the beam to the actual outline of the product — square, rectangular, triangular, diamond, trapezoidal — so a display does not have to be shaped to suit a circular pool. The beam zooms from 20° to 40° at 20W, or 18° to 36° in the two overlapping bands, with a movable ring switching between a sharp cut edge and a soft edge. UGR is held below 6 and the optical system is designed to produce no spill light and no stray light, which matters in a dark showroom where a halo around a display is immediately visible. Output on the track range is published per optic angle — 805 lm at 18°, 704 lm at 24°, 799 lm at 30°, 722 lm at 36° at 3000K CRI 90+ — so the pool can be sized against a real lumen figure rather than a nominal wattage.
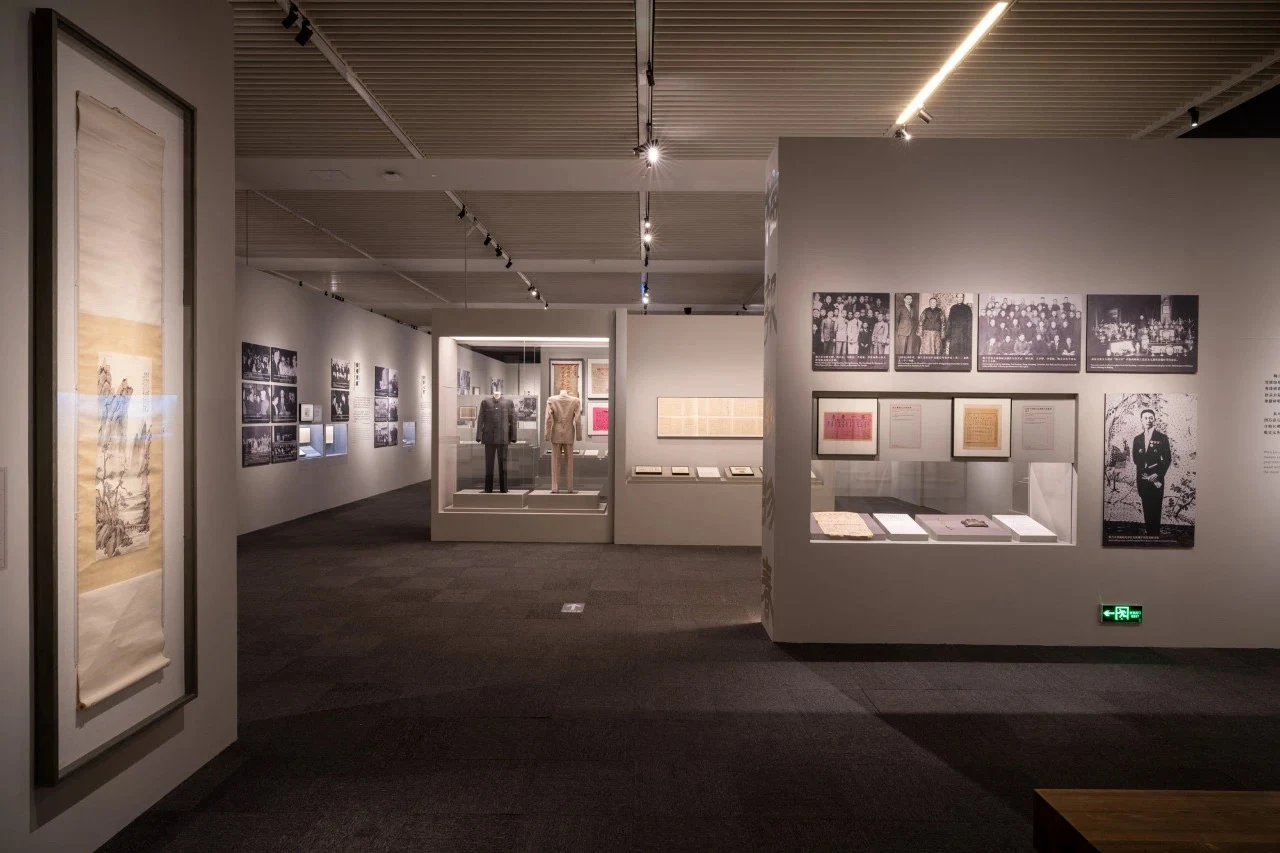
See the full specification on the IMAX-Projector 10–20W product page.
AIMER 25–35W — the workhorse for tall display walls
For high racks and long display walls the requirement is light output at distance, and AIMER delivers up to 95 lm/W with 3,186 lm at 35W on a 15° optic. The 355° head and 355° body rotation means the aim range covers anywhere on the floor without the cable binding, and the separate driver compartment gives it enough thermal headroom to hold 35W indefinitely. It is the fixture for the 6.0 m hall described earlier.
See the full specification on the AIMER Track Light 25–35W product page.
MEGA 15–20W — for material and colour confidence
A material library is the one place where colour rendering outranks every other consideration. MEGA is built for exactly that brief: CRI 90+ and 95+ chips, a flicker-free driver, and a snap-on filter system giving ten beam shapes from 10° to 60° plus a wall wash. Because the filters swap by hand, one fixture can be a 10° accent on a sample and a wall wash on the shelf above it, in the same colour temperature.
See the full specification on the MEGA Track Light 15W–20W product page.
SLEM linear light — the continuous line that carries the ceiling
The linear layer is what makes the ceiling look composed rather than perforated, and it is also what delivers the ambient fill at low output. SLEM runs in 2 ft, 4 ft and 6 ft modules at 20W, 40W and 60W, up to 120 lm/W, with a PC diffuser at 100° or a grille cover at 60° that brings UGR under 10. The L, X and T connectors allow a run to turn a corner or form a cross without a bespoke extrusion, and the tool-free mounting means the layout can be extended when the showroom is refitted.
See the full specification on the SLEM 2.4in linear light system product page.
Two more worth knowing
The MOVIA motorized track light 30W pans 0° to 360°, tilts to ±140°, zooms 18° to 60° and tunes from 2700K to 6000K, which is the right answer where a display changes configuration weekly and re-aiming by hand is not practical. The digital display track light 25W carries the CCT and dim level on the fixture itself, tunable from 2800K to 6000K, useful where sample walls need to be presented under more than one colour temperature.
Static showroom floors are mostly specified from the track lighting range and the linear light range; magnetic systems are usually reserved for feature walls where the rail must be nearly invisible.
Showroom track lighting: frequently asked questions
What colour temperature should showroom lighting be?
3000K is the default for furniture, upholstery, stone, tile and kitchen and bath showrooms: neutral enough for white and grey, warm enough for timber and leather. Automotive, consumer electronics and white goods show better at 3500K, where cool metallics and paint whites separate. Antiques and reclaimed materials sit at 2700K, and material libraries or sample walls often run 4000K for maximum colour separation at close range. Choose from the merchandise rather than the brand book, and hold one CCT across every fixture sharing a sightline.
How many track heads do I need per display wall?
Divide, do not estimate. Work out the pool diameter from mounting height and beam angle using D = 2 × H × tan(θ/2), set spacing at pool diameter × (1 − overlap) with 30 percent overlap, then divide the wall length by the spacing. A 12 m display wall lit from 4.0 m with 36° optics gives 2.60 m pools and 1.82 m centres, so seven heads. The same wall planned on a 1.0 m guess needs eleven, doubling head count and connected load.
Is track lighting or recessed downlighting better for a showroom?
Track in almost every showroom case. A recessed downlight grid cannot be re-aimed when the planogram changes, produces scalloping above the first line of displays, and gives the ceiling no line for the eye to follow. A continuous track or linear run delivers the same illuminance, keeps aiming adjustable, and reads as a deliberate architectural line. A downlight grid only wins where the ceiling is too low for visible hardware and the layout will never change.
How do I keep showroom track lighting from looking industrial?
Three moves: set the rail in the plane of the ceiling or baffle rather than hanging below it so a shadow line hides the profile; use a finish that matches the ceiling, such as handrail white on a white soffit or black on a dark baffle; and run a continuous linear diffuser alongside the track so the dominant ceiling element is an unbroken line of light rather than a row of individual bodies.
What UGR do I need to stop glare in a showroom?
UGR ≤ 19 on the general floor, UGR ≤ 16 for any head within 30° of a main sightline, and UGR < 10 for heads mounted below eye level or aimed at mirror-finish product. The last number is driven by geometry: a fixture on a 4.0 m ceiling aimed 30° off vertical falls about 25° below eye level, inside the field of view of a visitor looking at a product at normal display height.
Can I change showroom lighting later when the layout changes?
That is the main reason to use track. Heads slide and re-aim along the run, filters swap by hand on families such as MEGA, and the colour specification stays with the fixture rather than the ceiling. Specify the colour data as a batch — CRI Ra, R9, TM-30 Rf and Rg, and SDCM ≤ 3 steps — so a head added years later still matches the row it joins.
What CRI do I need for a showroom?
Specify CRI Ra ≥ 90 for general showroom floors and Ra 95+ for material sample walls, then state R9 separately at 50 minimum and 80 or above wherever red, timber or leather is being compared. Add TM-30 Rf ≥ 88 with Rg between 95 and 102, and SDCM ≤ 3 steps across every head on the floor. A single CRI number is not a colour specification.
Specify in the order that survives the value engineering
Showroom projects lose their lighting in a predictable sequence: the colour specification is trimmed to a single CRI number, then the head count is reduced, then the linear layer is cut because the downlights are already in the budget. The way to protect the design is to fix the order of decisions and defend each one with its own arithmetic.
Colour first — CCT from the merchandise, Ra and R9 and TM-30 and SDCM written as four separate numbers. Coverage second — pool diameter from height and optic, spacing from overlap, head count from wall length, load from the published per-model wattages. Conceal third — rail in the ceiling plane, finish matched to the soffit, one continuous linear run carrying the ambient layer, UGR controlled by geometry as well as by optics. Then choose fixtures, and by that point the fixture list is not a matter of taste.
Encore manufactures the track, linear, framing projector and magnetic systems that this method specifies, from the same CCT and CRI families, so one colour specification can carry a whole showroom floor. If the project includes display cases or light-sensitive goods, read our museum lighting requirements first — the UV and lux limits change the fixture choice before the showroom arithmetic begins.
Send us the ceiling height, the display layout and the material schedule, and we will return a numbers-first specification with CCT, CRI, R9, TM-30, beam angles, spacing and head counts for each zone. Talk to the Encore specification team, or start from our track lighting RFQ guide if the project is going out to tender.
Further reading: IES recommended practice for retail and display lighting and the U.S. Department of Energy solid-state lighting standards.