
Ask ten exhibitors what went wrong at the last show and four will say the same thing: the booth was dark, or the graphics looked muddy, or nobody could tell where to look. None of that is a power problem. It is a task plane problem. Booth lighting fails because the plan lit the carpet and the visitor was reading a wall.
This guide is about the specific case of track lighting for exhibition and trade show booths — a portable, rail-mounted system that travels in a case, rigs in about an hour, aims in minutes and comes down in half that time. You will get the task-plane targets by booth zone, the arithmetic that turns each target into a head count, three booth layouts drawn to scale, and the rigging/spares discipline that separates a system you can reuse for six seasons from a box of adaptors nobody remembers buying.
If you are still deciding whether track is the right family at all, start from our overview of commercial track lighting and the primer on lux vs lumens. If your project is a permanent museum or gallery rather than a travelling booth, the correct references are our museum track lighting specification and gallery track systems guide; those document conservation limits and voltage architecture that a three-day booth does not need.
The short version. Backwall graphic 300–500 lx on the vertical face at 1.60 m. Product on a plinth 500–750 lx horizontally at 1.00 m. Hero product 750–1,000 lx on the vertical face. Counter and demo table 300–500 lx. Walkway and approach 150–300 lx on the floor. Every value is a maintained figure at a stated plane, and every one of them is achievable from a single rail at 2.44 m if the optic is chosen for the plane rather than for the room.

Why Exhibition Lighting Is Not Shop Lighting With Less Time
A booth is a room that exists for three days, has no ceiling of its own, is lit by a system that fits in a car, and is judged by people walking past at 3 km/h who decide whether to enter in under two seconds. Four consequences follow, and each one changes a specification decision.
- The visitor reads vertical faces. In a store the shopper walks the aisle and looks at shelves on both sides. In a booth the visitor stands in the aisle and looks at a backwall graphic, a hanging banner and a lit product. Almost all of the value is on vertical planes. Horizontal illuminance on the carpet is nearly irrelevant — and it is what most booth lighting budgets get spent on.
- There is no ceiling, only a structure you brought. Rig height is whatever your truss or backwall allows, usually 2.44 m to 3.05 m. That is an unusually low source height, which is good for punch and bad for glare: at 2.44 m a 24° head aimed at a 1.00 m plinth delivers a 0.61 m pool, and the same head aimed across the aisle puts a bright spot straight into a passer-by’s eye line.
- The ambient is uncontrollable. Hall lighting is set by the organiser, usually between 300 and 500 lx at floor level, and it is flat, cool, and often high above your stand. Your accent layer has to beat a 400 lx surround to create any hierarchy at all, which is why track heads with real beam control rather than decorative pendants are the professional answer.
- Time on site is the real constraint. Move-in is measured in hours and the riggers are union-staffed and metered. A design that needs 40 aim adjustments and a scaffolding tower will be compromised before the doors open. Aimability, tool-free accessories and an unambiguous layout are worth more than the last 10 percent of optical efficiency.
Task Planes in a Booth: Five Surfaces, Five Targets
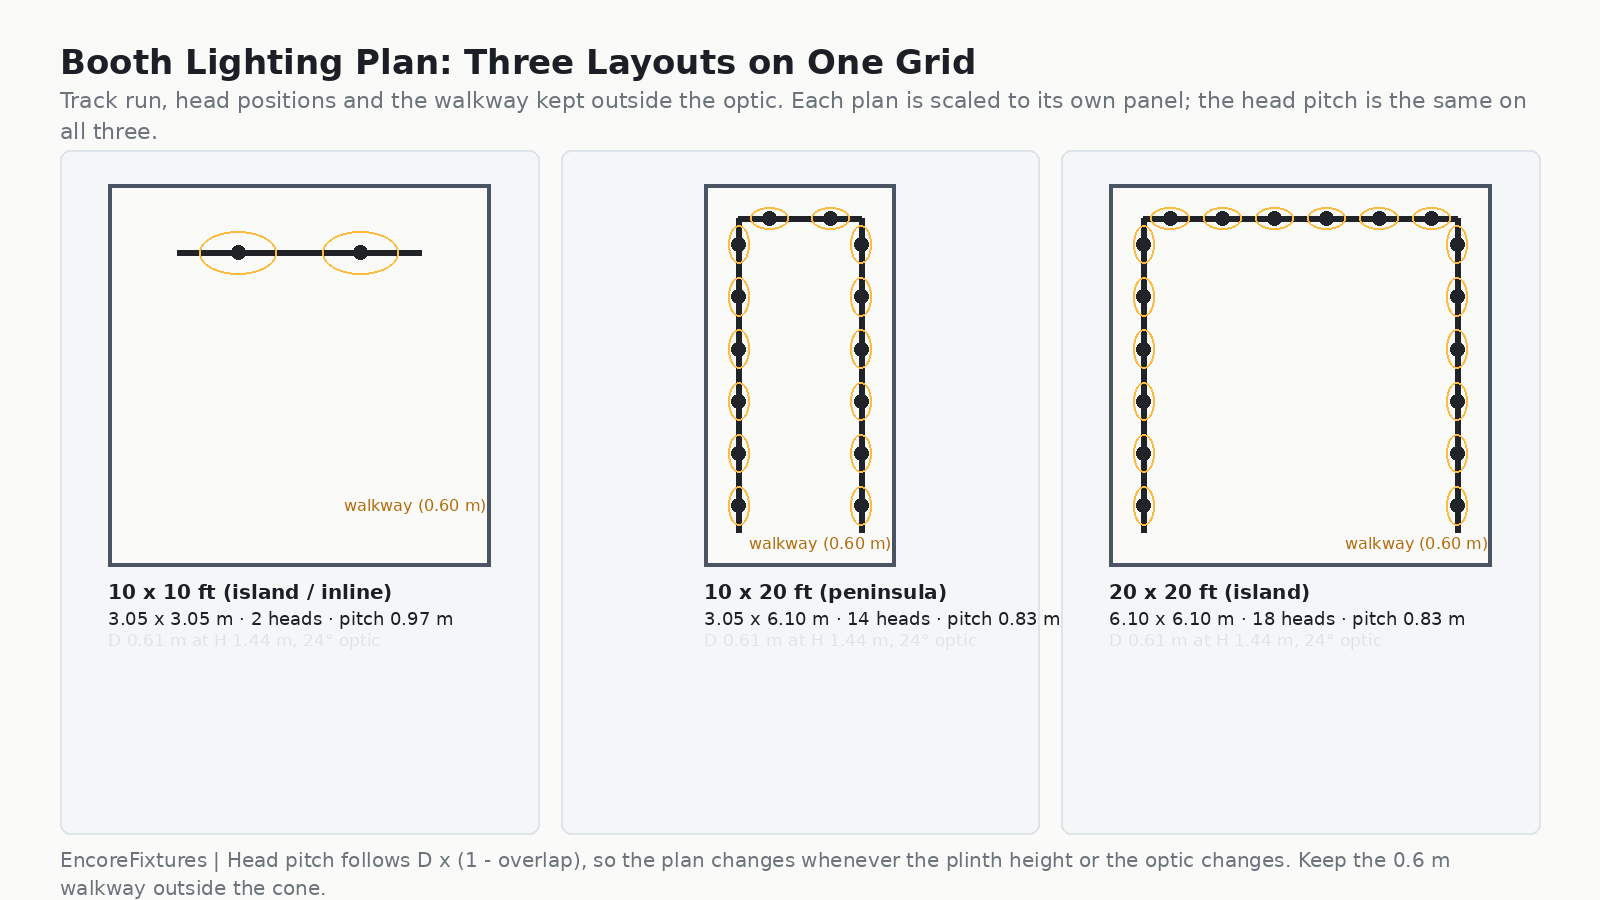
Name the plane before you name the lux. In a booth there are five planes that matter, and the distance from the rail to each one is different — which means the pool size from the same optic is different in each case. The table below is what we specify for a booth with a 2.44 m rig and a 1.00 m plinth.
| Booth zone | Target (maintained) | Task plane | Why |
|---|---|---|---|
| Backwall graphic | 300–500 lx | Vertical face @ 1.60 m | The brand promise is read here. Even wall-washing beats a bright pool in the middle of the logo. |
| Hanging banner / header | 300–500 lx | Vertical face @ 2.20 m | Visible above the crowd from two aisles away; wash it, do not spot it. |
| Product on plinth | 500–750 lx | Horizontal @ 1.00 m | Detail, texture and finish; a 15°–24° optic keeps the pool on the plinth top. |
| Hero product | 750–1,000 lx | Vertical face @ 1.20 m | The one object you want people to touch; 3:1 to 5:1 against its surround. |
| Counter / demo table | 300–500 lx | Horizontal @ 1.00 m | Paperwork, tablets, samples. Shadows matter more than level here. |
| Walkway / approach | 150–300 lx | Floor @ 0.00 m | Safety and welcome, not selling. Keep it below the graphic so the hierarchy holds. |
Two numbers in that table are the ones briefs get wrong. The first is the asymmetry between the graphic and the walkway: a booth that measures 500 lx on the carpet and 250 lx on the backwall has inverted its own hierarchy, and the stand will look flat and cheerless from the aisle no matter how many lumens are installed. The second is uniformity across the graphic. A backwall at 400 lx average with a 90 lx band across the middle of the logo reads as a mistake to every visitor, and no amount of added output removes a band; the fix is spacing the heads by pool geometry, which is the arithmetic in the next section.
From a Target to a Head Count: The Booth Arithmetic
Booth lighting budgets get argued about in units of “heads” rather than lumens, so it is worth doing the arithmetic once properly. The flux that has to leave the luminaires is the target illuminance times the area, divided by the utilisation factor (how much of the flux lands on the surface) and the maintenance factor (how much survives dirt and LED depreciation).
Φ = lux × A / (UF × MF), where we use UF 0.85 and MF 0.80 for a show-floor environment. Then heads = Φ / delivered lumens per head.
| Booth size | Area | Target | Required flux | Heads at 15 W / 1,500 lm | Accent pitch |
|---|---|---|---|---|---|
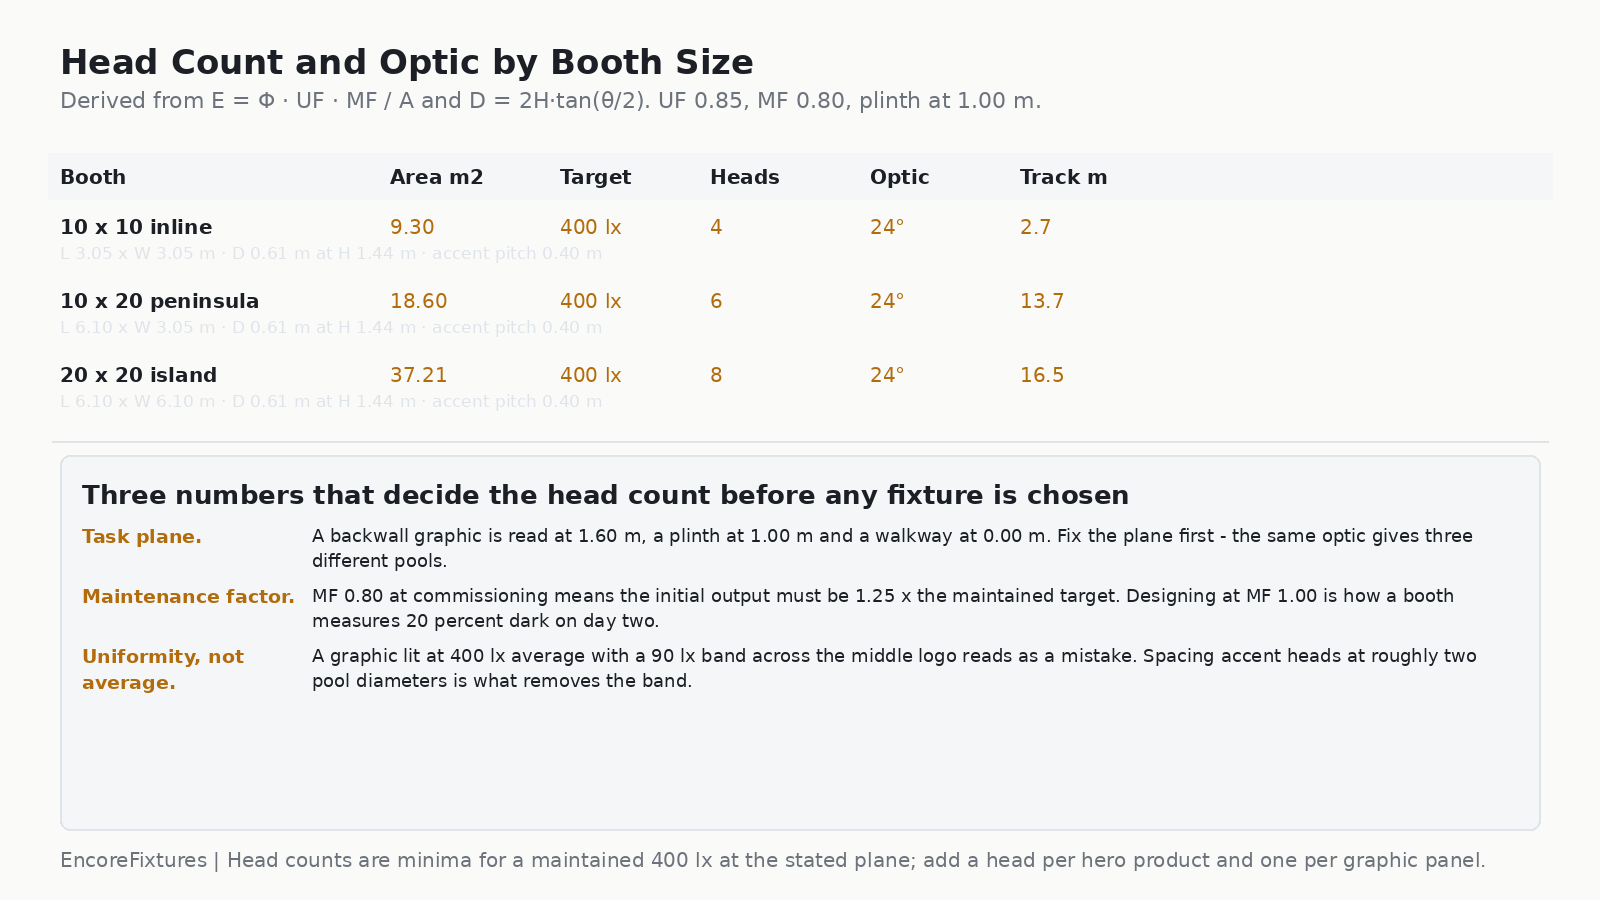
| 10 x 10 ft (3.05 x 3.05 m) | 9.3 m² | 400 lx | 5,470 lm | 4 | 0.97 m |
| 10 x 20 ft (3.05 x 6.10 m) | 18.6 m² | 400 lx | 10,940 lm | 6 | 0.83 m |
| 20 x 20 ft (6.10 x 6.10 m) | 37.2 m² | 400 lx | 21,880 lm | 8 | 0.83 m |
Read that table as a floor, not a ceiling. It is the minimum to hold a maintained 400 lx across the stand area with no dark bays. In practice you add a head per hero product, a head per graphic panel you want washed separately, and one spare per rail so a failed head is a two-minute swap rather than a show-long apology. That is how a 10 x 20 booth ends up with 10 to 12 heads rather than six, and it is the right answer.
The other equation that decides the layout is the pool. D = 2H × tan(θ/2) gives the lit diameter at a distance H from the head to the plane you are lighting. At a 2.44 m rig and a 1.00 m plinth, H is 1.44 m, so a 24° head delivers a 0.61 m pool — a little over half a metre. Measured against the plane, not the ceiling. This is why a booth planner who sizes optics by ceiling height gets it wrong twice: once for the plinth and once for the graphic.
Practical Track Systems for a Booth That Travels
A show system is judged on four things that never come up in a fixed installation: how fast it rigs, how little it weighs, how it survives the road case, and whether the parts are still available next season. Those four requirements point at a specific kind of hardware.
Rig height and the 2.44 m problem
Most booths hang the rail between 2.44 m and 3.05 m. That is above head height and below the sightline of the hall’s own lighting, which is exactly what you want for accent work — but it is close enough to the visitor for glare to be the dominant failure mode. Two things fix it. The first is anti-glare accessories: a honeycomb filter or a set of barn doors takes glare down without changing the beam’s shape, and on a rail at 2.44 m it is not an optional extra. The second is vertical aiming discipline: keep the beam’s outer edge inside the stand’s footprint and never aim a narrow optic across the aisle at eye height.
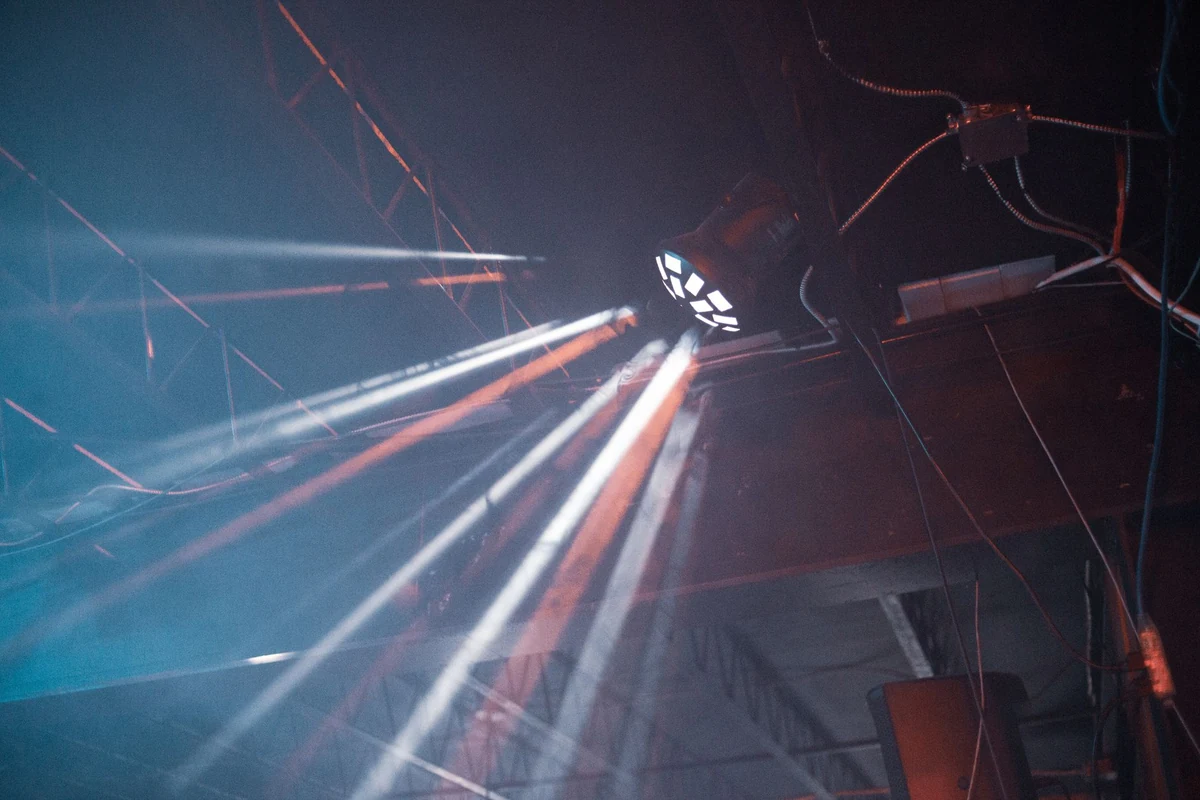
Aim range is the other half of the rig-height question. A head that swivels 360° horizontally and 90° vertically from a single point on the rail can cover a plinth in front of it, a graphic behind it and the approach beside it, which means fewer rails, fewer joiners and less rigging time. That matters more on a show floor than it does in a building.
What to carry, and what to leave behind
Rental is right for a one-off show; owning is right from about the second or third show, because the system is the same every time and the freight is easier to control than a rental desk’s availability in peak season. If you own, the spares list matters more than the main list.
| Carry always | Quantity | Reason |
|---|---|---|
| Spare track head, matched optic | 1 per rail | Swap in two minutes; a failed head in a rental system is a show-long compromise |
| Spare track connector / joiner | 2 per booth | The connector is the highest-wear electrical part on the rail |
| Spare mains feed and plug set | 1 | Show power outlets are never where the floor plan says |
| Honeycomb filters and barn doors | 1 set per 4 heads | Glare control is venue-dependent and cannot be ordered on site |
| Aim template and lux meter | 1 each | Turns “that looks fine” into a repeatable setting you can log |
| Spare lamps / driver module | 1 per family | Keeps the fixture family consistent across seasons |
Rig, aim, strike — the labour nobody budgets for
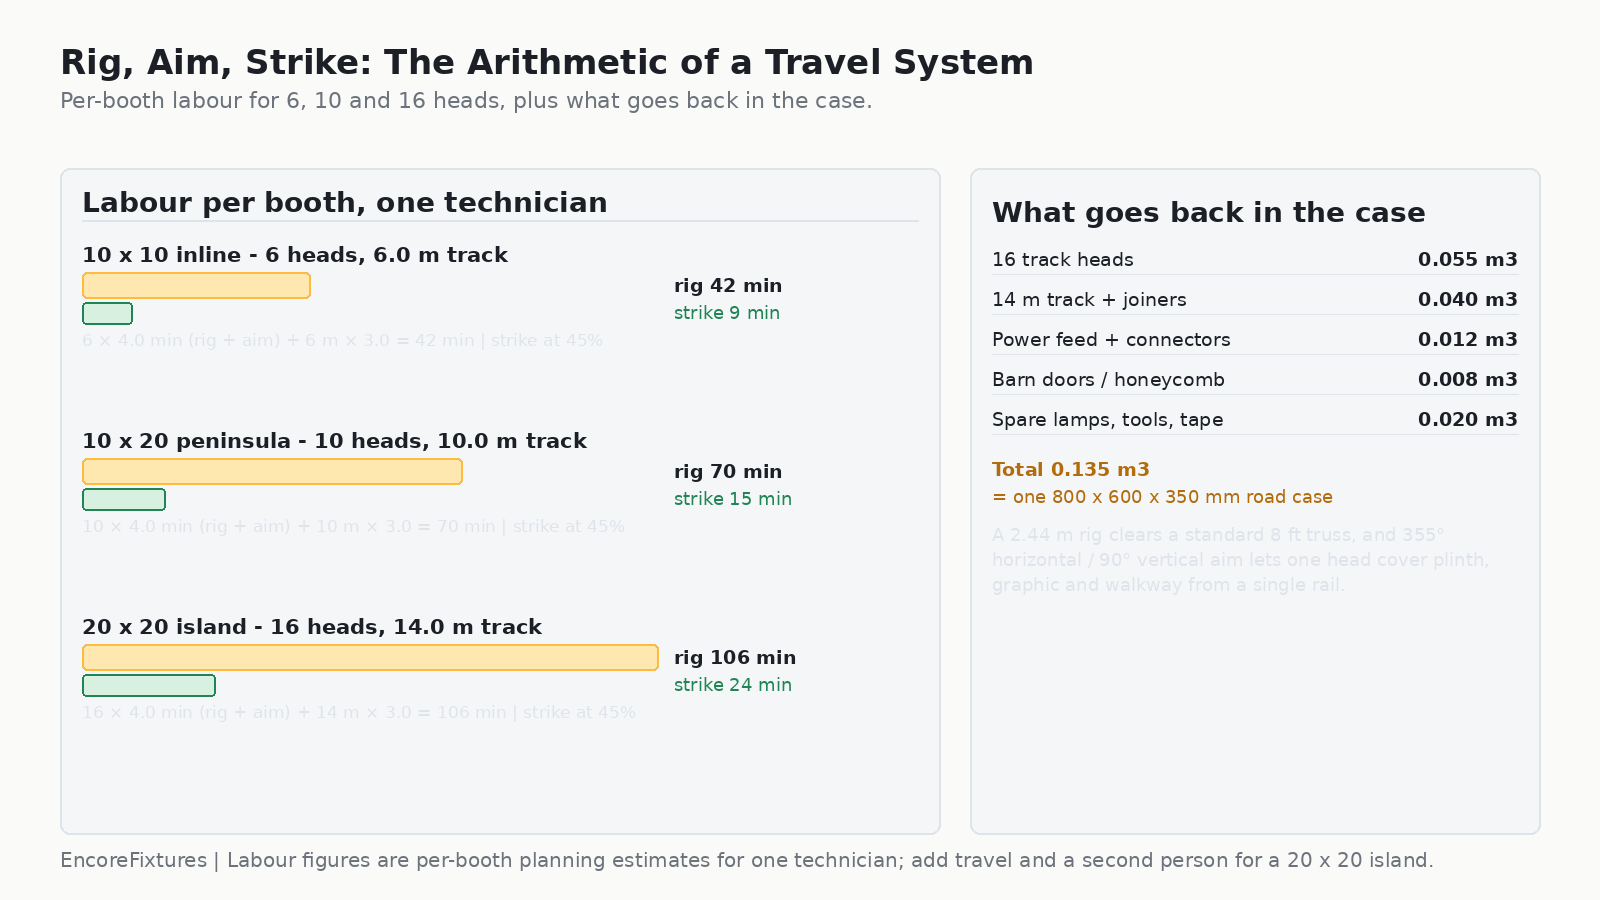
Rigging time is where a good system pays for itself. Budget roughly 2.5 minutes per head to mount and connect, 1.5 minutes per head to aim and lock, and 3 minutes per metre to hang the rail. A 10 x 20 booth with 10 heads and 10 m of track is therefore about 70 minutes of one technician’s time to rig and roughly 15 minutes to strike if the heads come off the rail in one piece — which is the argument for keeping heads mounted on short rail sections inside the case instead of breaking every joint.
Three Booth Layouts, Drawn to Scale
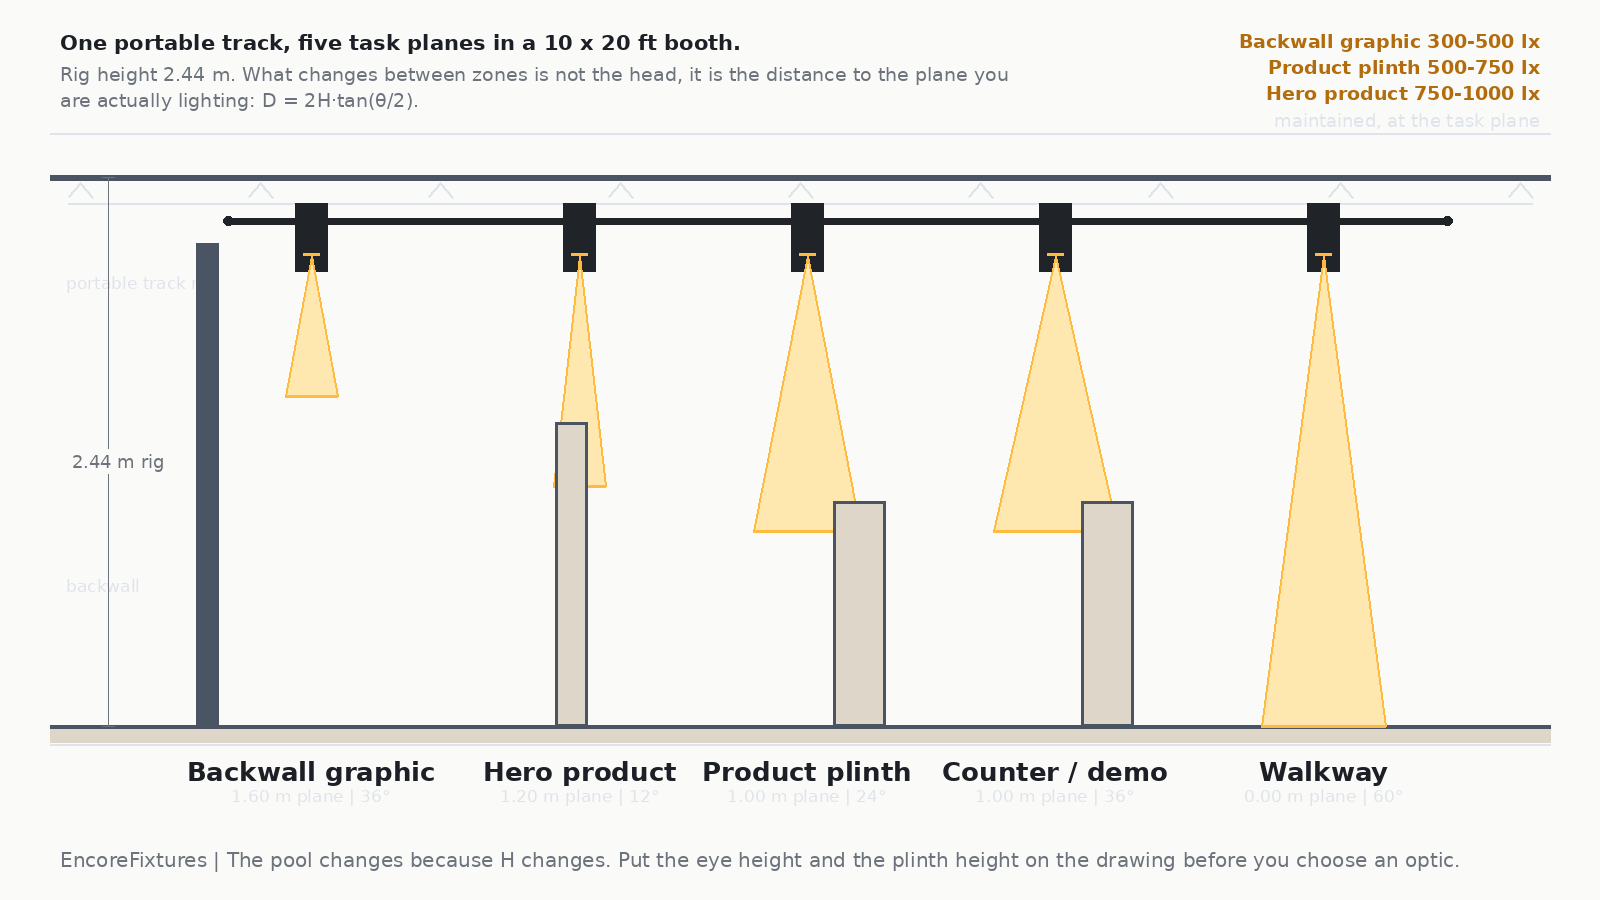
Most show floors sell four geometries, and each has a lighting logic of its own. The plan below is drawn to scale with real head pitch, so the three cases can be compared directly.
10 x 10 inline: one wall, one rail, five heads
An inline stand has one open side and one backwall. All of the value is on that wall, so the rail runs along it at about 0.55 m out, and the accent heads aim down and slightly back. Five heads at roughly 0.97 m pitch hold a 400 lx wash across a 3.05 m backwall with no band. Do not put a head at each end aiming outward: those two are the ones that glare into the neighbouring stand and into the aisle.
10 x 20 peninsula: two open sides, two competing sightlines
A peninsula is read from the front and from one long side, which means the lighting has to work in two directions and the two runs must not fight. Split the rail into a backwall run for the graphic and a shorter run carrying the plinth and counter heads, so the two sightlines can be aimed and adjusted independently. This is the geometry where a single continuous rail tempts you into a compromise aim that is mediocre in both directions.
20 x 20 island: three rails, and a centre that needs its own logic
An island is open on all four sides, so it has no backwall to wash and no natural place to put the graphics — which is exactly why islands are the hardest and the most impressive when lit well. Run track along three sides at about 0.55 m in from the edge, and treat the centre as its own zone: either a pendant or a second short rail over the central feature. Skip the centre and the middle of a 6 m booth reads as an unlit hole from every direction.
Glare, Colour and the Graphics You Brought
Three details separate a booth that photographs well from one that merely looks bright on site.
Glare is a rig-height problem, not a lumen problem. At 2.44 m, a 24° head aimed horizontally throws its bright edge at the eye height of everyone in the aisle. Aim down and in, fit honeycomb, and check the stand from the aisle at the far end of the row before the doors open — that is the only view that matters.
Backlit and printed graphics behave differently. A backlit fabric graphic is a light source in its own right; lighting it from the front at 500 lx fights its own internal brightness and washes the print out. Aim to within about 40 percent of the graphic’s internal luminance and let it carry itself, or dim the accent layer over it. Printed matte graphics are the opposite: they need a genuine 300–500 lx wash, evenly, with the heads far enough back that the beam does not create a hot spot on the panel nearest the rail.
Colour temperature should match the hall or beat it deliberately. Show halls typically run 3,500–4,000 K flat ambient light. If your accent layer is 3,000 K, it will read warm and inviting against a cool surround, which is a legitimate and effective design choice. What never works is mixing 2,700 K and 4,000 K heads on the same rail: the stand looks like it was lit by two different people, because it was. Pick one temperature per stand, state it, and keep a note of it in the case — that is how season three matches season one.
There is no conservation requirement in a three-day booth, so a CRI of Ra 90 or better with a stated R9 is usually enough for merchandise and graphics, and the CRI question in a booth is really about whether a colour-critical product — cosmetics, apparel, printed collateral — is being judged under your light or the hall’s.

Three Ways a Booth Lighting Plan Fails
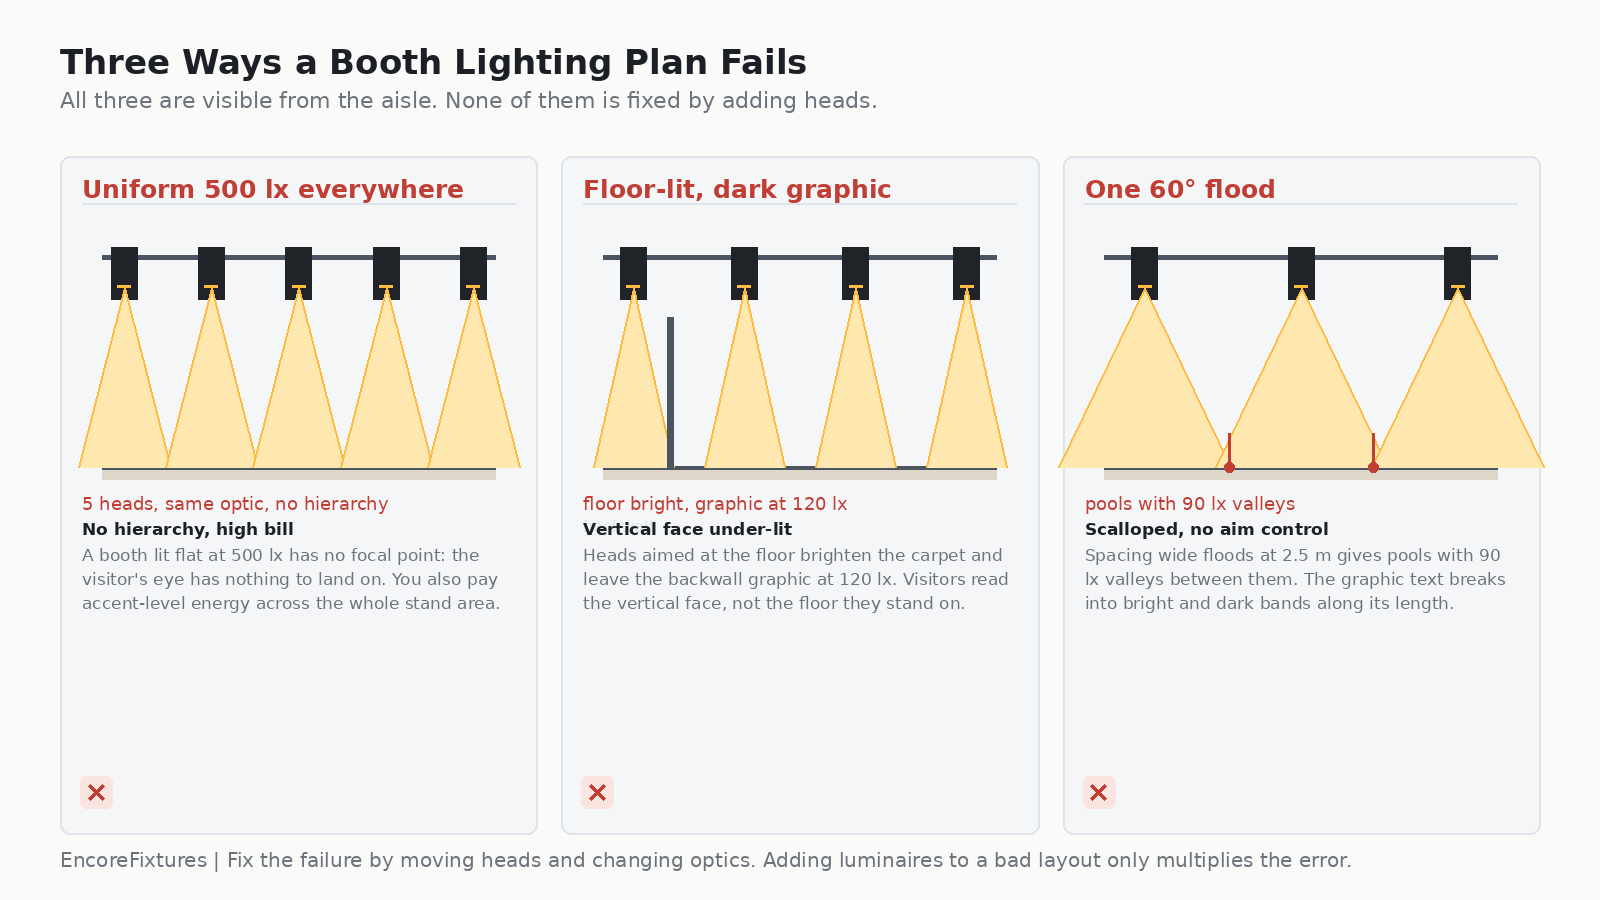
All three of the failures below are visible from the aisle, and none of them is fixed by adding luminaires.
| Failure | What it looks like | The fix |
|---|---|---|
| Uniform 500 lx everywhere | Flat, no focal point; the eye has nowhere to land, and the bill is paid at accent prices | Drop the ambient layer, keep the accent layer; aim at a 3:1 ratio between hero and surround |
| Floor-lit, dark graphic | Carpet bright, backwall graphic at 120 lx. Visitors read the wall, not the floor | Re-aim to the vertical plane; a 36° or 45° head washing down the wall beats a 24° head on the floor |
| Wide floods at wide spacing | Scalloped pools with 90 lx valleys between them; graphic text breaks into bright and dark bands | Spacing follows the pool, not the rail: set pitch from D = 2H·tan(θ/2) and change the optic before adding heads |
Packing, Transport and the Case That Survives Season Two
The gap between a booth lighting system and a box of loose luminaires is the case, and specifically the decision to keep whole rail sections loaded with their heads. A 20 x 20 island carry set — 16 heads, 14 m of track, feeds, accessories and spares — comes to roughly 0.135 m³, which is one 800 x 600 x 350 mm road case on castors. That is a number worth knowing before you buy, because it is often the difference between shipping the system with the booth freight and paying a separate consignment charge.
Two habits keep the case working. Label every rail section with its position in the plan, and keep an aiming log with the case: rail heights used, head positions, optic per head, dimmer preset and CCT. Season three then takes twenty minutes of aiming instead of two hours of guessing, and any technician can rig it without your being on site.
FAQ: Track Lighting for Exhibition Booths
How many track lights does a trade show booth need?
For a maintained 400 lx across the stand area with UF 0.85 and MF 0.80, a 10 x 10 booth needs 4 heads at 15 W / 1,500 lm, a 10 x 20 needs 6, and a 20 x 20 needs 8. Treat those as minima: add one head per hero product, one per graphic panel you want washed separately, and one spare per rail. In practice a 10 x 20 booth carries 10 to 12 heads.
What lux level should a booth backwall graphic be lit to?
300–500 lx on the vertical face at roughly 1.60 m, evenly across the whole panel. Uniformity matters more than the average: a graphic at 400 lx with a 90 lx band across the middle of the logo reads as a mistake. Space the washing heads from the pool geometry rather than from the rail length.
Should I aim booth lights at the floor or at the graphics?
At the graphics and the product, not the floor. Visitors read vertical faces, so horizontal illuminance on the carpet is nearly irrelevant to whether the stand reads well. Keep the walkway at a deliberately lower 150–300 lx so the hierarchy points at the merchandise rather than at the aisle.
What beam angle should I use on a 2.44 m booth rail?
It depends on the plane, not the ceiling. A 24° head on a plinth 1.44 m below the rail gives a 0.61 m pool, which suits a single object; a 36° or 45° optic washes a backwall; a 10°–15° projects a tight pool on a hero detail. Use D = 2H·tan(θ/2) with H measured to the plane you are lighting, and fit honeycomb or barn doors at this rig height because glare is the dominant failure mode.
Can I rent exhibition track lighting instead of buying it?
Yes, and rental is usually right for a one-off show. Ownership starts to pay from roughly the second or third show, because the system is identical each time and the freight is easier to control than a rental desk’s peak-season availability. If you own, budget spares rather than extra heads: one spare head or matched optic per rail, two spare connectors, a spare mains feed and a set of glare accessories.
How long does it take to rig and strike a booth lighting system?
Budget about 2.5 minutes per head to mount and connect, 1.5 minutes per head to aim and lock, and 3 minutes per metre to hang the rail. A 10 x 20 booth with 10 heads and 10 m of track is therefore around 70 minutes to rig for one technician, and roughly 15 minutes to strike if whole rail sections come down still loaded with their heads.
Specify the Plane, Then Pack the Case
Track lighting for exhibition and trade show booths is not a smaller version of a shop lighting scheme. It is a specification built around vertical faces, an uncontrollable 400 lx ambient, a rig height of about 2.44 m and a rigging window measured in hours. Get the five task planes right, size the optics from D = 2H · tan(θ/2) rather than from the ceiling, and size the head count from Φ = lux · A / (UF · MF) — then the same equipment works for the 10 x 10 you booked this season and the 20 x 20 island you will book next year.
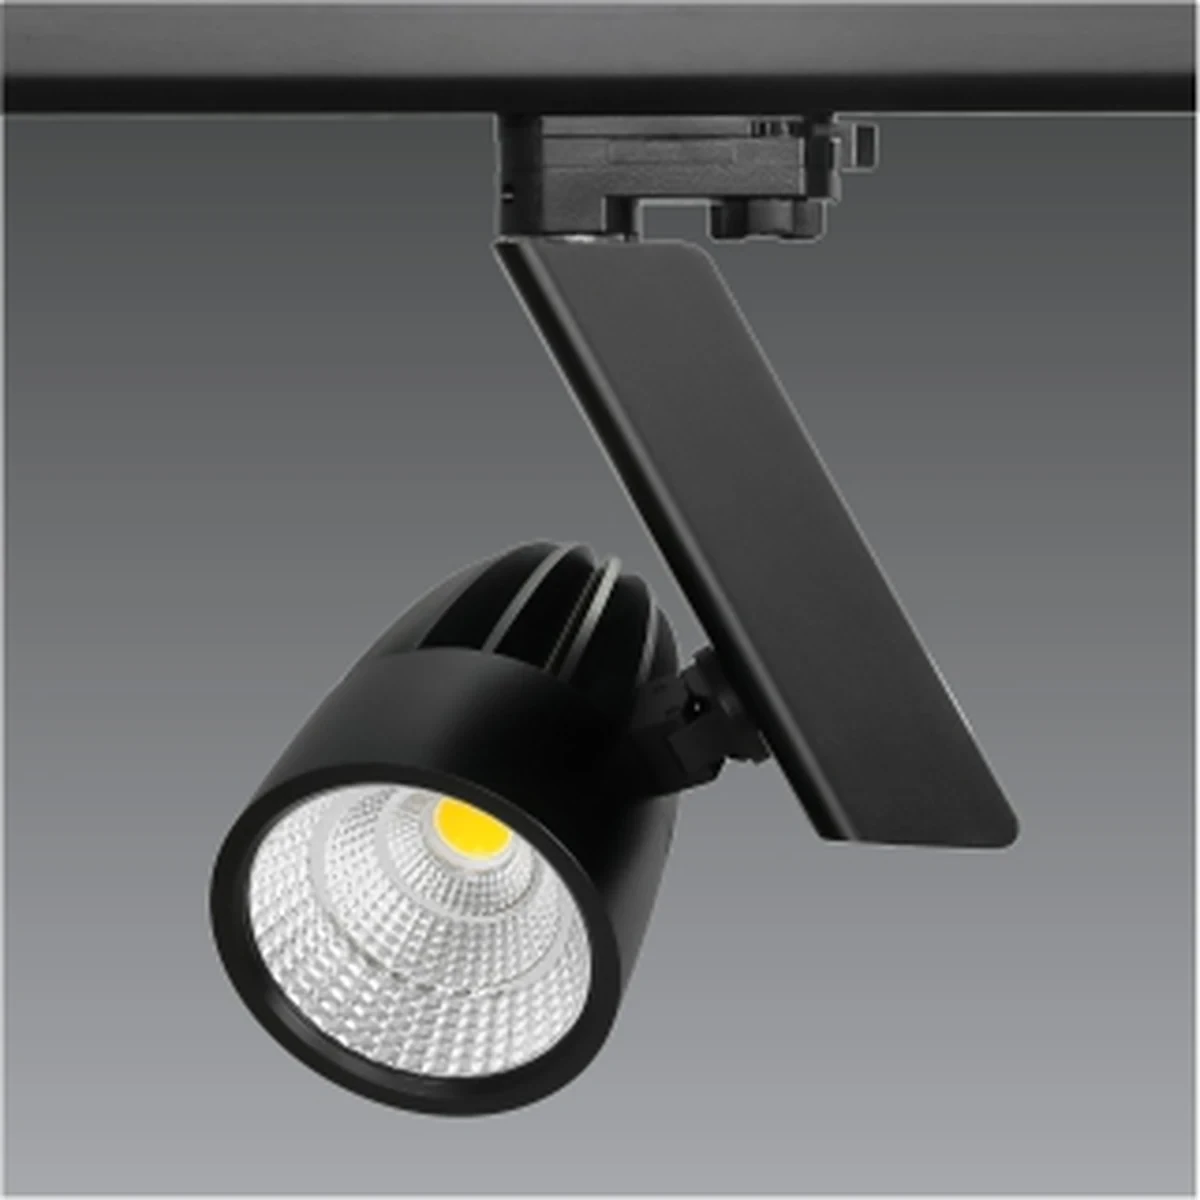
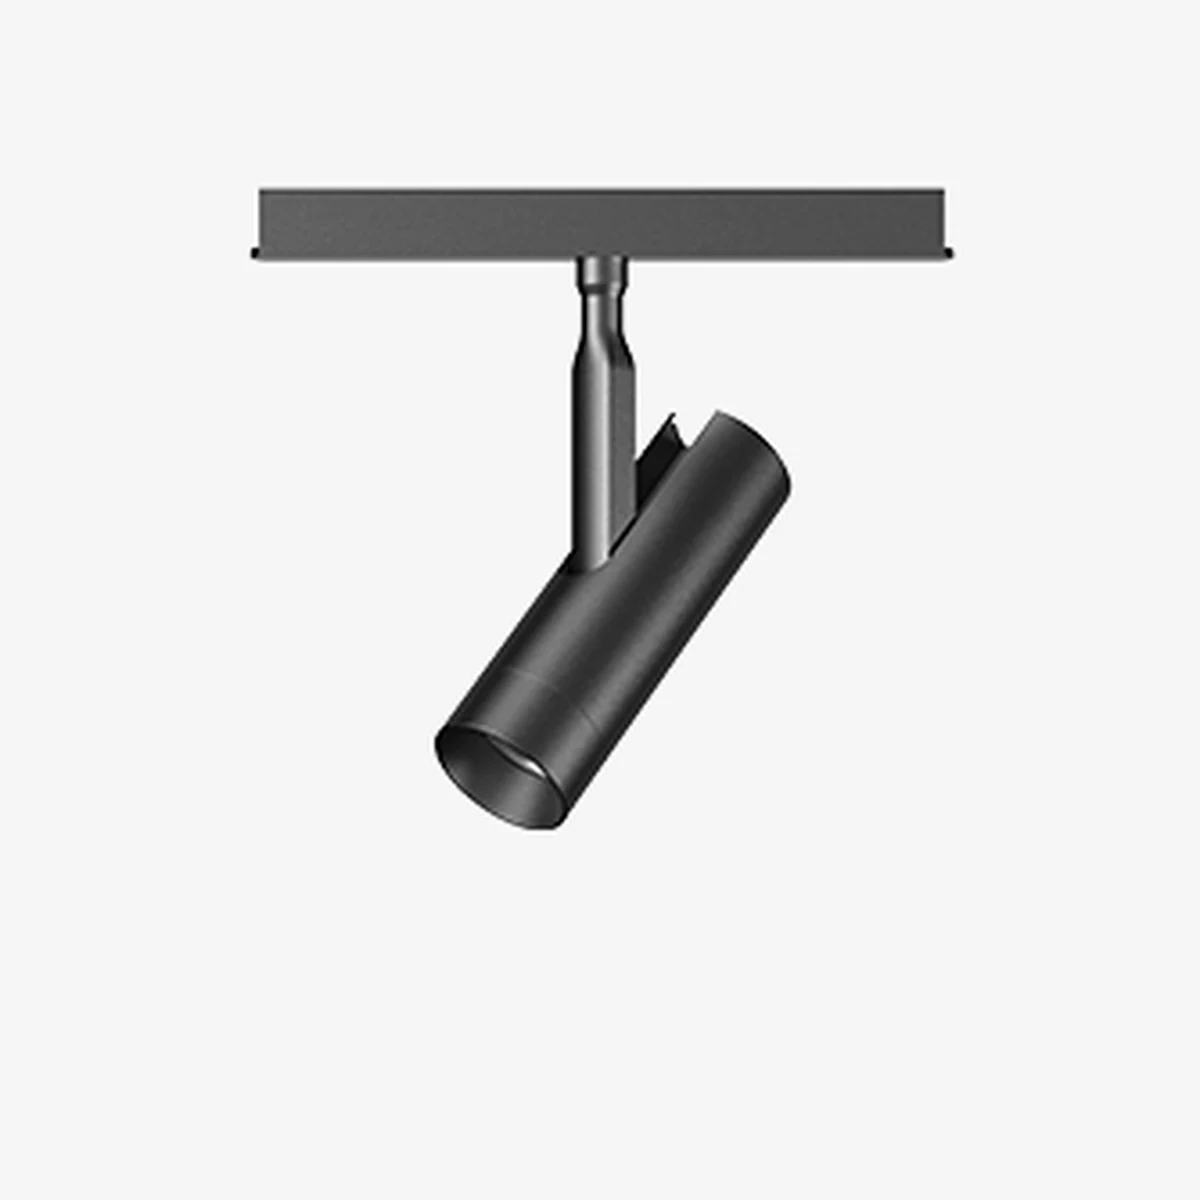
ENCORE builds the hardware this kind of plan needs. The track light range covers aimable heads with interchangeable optics and anti-glare accessories; the OVEGA-Zoomable 20W–30W adjusts from 10° to 60° on site, which is exactly what a travelling booth needs when the same head has to serve a plinth at 1.00 m and a walkway at floor level; the AIMER track head offers 15°, 24°, 38° and 60° interchangeable reflectors with a 355° swivel and optional honeycomb, and is the fitting we send out most often for exhibition and gallery work; and the FLEX-Zoomable 15W–20W is the compact option where the truss is short and weight matters. The linear light range handles the continuous washes, and the magnetic track systems let a stand be re-planned between shows without re-wiring.
| Booth zone | Target | What we would specify |
|---|---|---|
| Backwall graphic wash | 300–500 lx vertical | 36°–45° heads on a back rail at 0.55 m out, even pitch, honeycomb fitted |
| Hero product | 750–1,000 lx vertical | 10°–15° optic, 3:1 against its surround, aim logged per show |
| Product plinth | 500–750 lx horizontal | 15°–24° optic at a 0.61 m pool; one head per plinth, no sharing |
| Counter / demo | 300–500 lx horizontal | 36° heads, shadow-free, offset from the operator side |
| Walkway / approach | 150–300 lx floor | Wide optic kept inside the stand footprint; never aimed across the aisle |
Send us your booth dimensions, the truss height you have booked and the graphics plan, and we will return a booth-specific specification: zone-by-zone lux targets, optic per head, pool diameter, head pitch, CCT, CRI and R9, the head count, and a packing list for the case. Talk to the Encore specification team, or start from our overview of commercial track lighting and the track light product range.